May 15, 2019
White Balance – what is it?
The temperature of light can change the look and feel of your photographs
Sunrise and sunset are the two parts of the day where you can clearly see that the type of light changes. About an hour after the sun rises and an hour before the sun sets there is a golden quality to the sunlight. The hour before sunrise and the hour after sunset sees the light change to a more blue colour. If we are trying to take a photograph that closely resembles the scene our eyes see, not only do we need to get the exposure correct, we also need to match the ambient light temperature to give an accurate representation of the scene. The way we change the light temperature is to alter the White Balance.
Colour temperature is measured in degrees Kelvin (K). The Scottish mathematician and physicist William Kelvin proposed the absolute, or Kelvin, scale in 1848. This scale uses −273.15°C as its zero point or ‘absolute zero’. The colour temperature is simply the colour a standard black body (a piece of metal which is perfectly black and reflects no light) glows at the warm colours are the blues at the 20,000K end of the spectrum. Neutral white light is 6,504K.
How do we change the White Balance?
If you read your camera manual, there will be a button marked WB. When you press this button you will be presented with a number of options. Camera manufacturers have provided a number of pre-sets that set the temperature of light being recorded by the camera to different conditions.
The options you will usually see are in the table below

When you look at this diagram it will probably look odd. If you work in a building with fluorescent lighting it feels cold, yet the kelvin value being applied is a warmish colour temperature (3800k). This is because if the camera took the photograph uncorrected a white wall in a fluorescent-lit room would appear yellow/orange. The white balance setting on your camera is, therefore, correcting the colour temperature so it is captured as you see it. This works well if you the conditions you are shooting in meets one of the pre-set values.
Auto White Balance works by allowing the camera to try and identify something which is white in the scene and then sets the Kelvin value to the most appropriate for the conditions. However, if there isn’t anything white or if there is a lot of one colour then the camera can get confused resulting in an image with an incorrect colour cast.
Custom White Balance allows you to tell the camera an area in a photograph that should be used to identify the colour white. This is often used by product photographers where it is essential the colour of something being sold is replicated accurately. They will first take a photograph of a piece of equipment called a grey card (which is a neutral grey colour) and then set the Kelvin value from this. You should refer to your camera manual for the detailed instructions on how to do this.
Finally, the Kelvin setting allows you to define the precise value that the camera should use. You can often buy light bulbs that will tell you the Kelvin value and so by inputting this value you will accurately reproduce the colours when the light bulb is switched on.
What effect does White Balance have on the photograph?
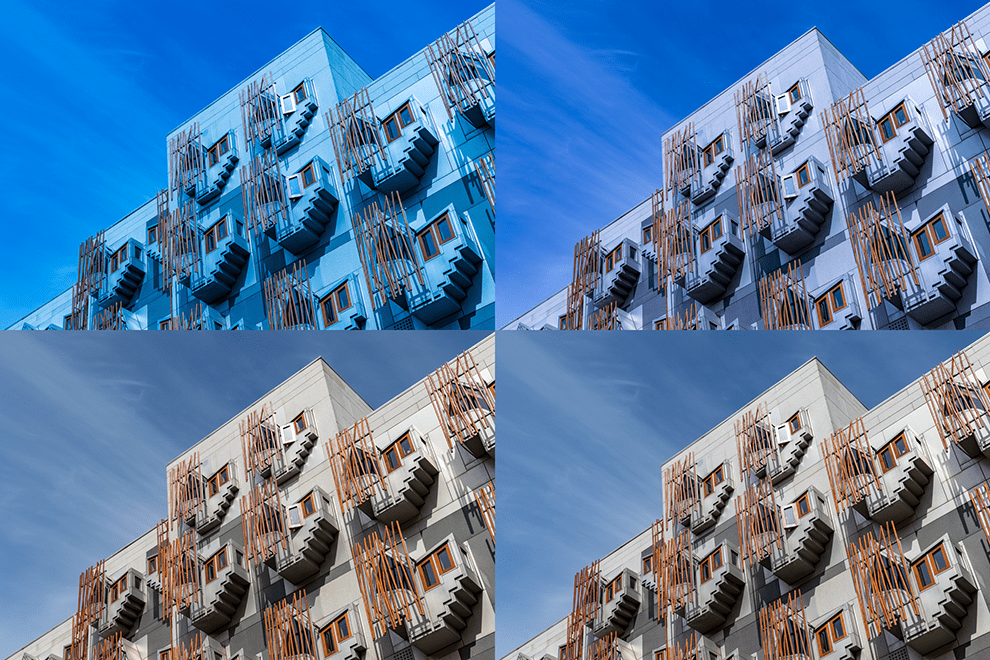
The following images all use the same subject, the Members Block of the Scottish Parliament. The shots were taken when the sun was fairly high in the sky with very light cloud coverage. Each photograph shows the effect of applying the White Balance correction.
Tungsten – The tungsten setting would usually be trying to correct the yellow light emitted from a tungsten light. As a result, the image shot in daylight appears with a heavy blue cast.
Fluorescent – Fluorescent lights are slightly cooler than tungsten. This means there needs to be less blue applied to the photograph to correct the lighting. There is still a blue tint applied but not as severe as the previous image.
Daylight – This looks to be the closest pre-set to the actual conditions. The end image gives quite a good reproduction of the scene as viewed.
Flash – As the light being emitted from a flash is warmer (more blue) there needs to be a greater amount of yellow being applied so we start to see the clouds lose their whiteness.
Cloudy – Cloud makes the shadows appear bluer so we now start to see a stronger yellow cast being applied to the photograph.
Shade – This is the highest colour temperature of all the pre-sets. The grey walls of the building now have a definite yellow tint.
Auto White Balance – The Kelvin value that was applied automatically is 7000k. The camera can be confused when there is no white in the image as appears to be the case in this shot.
Kelvin – This should be the most accurate depiction of the colours seen. The white balance has been applied by measuring the Kelvin value from the neutral grey walls. This method has applied a value of 5450k – halfway between daylight and flash.
Do I need to spend time measuring the White Balance?
The very short answer is no. However, this is on the basis that you are shooting in RAW. When shooting in RAW you will be able to edit the White Balance in your editing software by selecting the presets that are available on your camera. If you have shot using JPEGS then it is still possible to change the white balance in post-processing but it will be a much more manual process as the presets are not available.
If it is absolutely vital that you need to reproduce the colour of an item, for example, if you are selling products, then there is a lot of benefit of using a grey card and manually setting the Kelvin value in camera.
Please sign up for the Edinburgh Photography Workshop monthly newsletter where you’ll get regular updates on interesting things happening in photography and some great tips. Sign up by clicking here.