February 26, 2020
Water Drop Photography
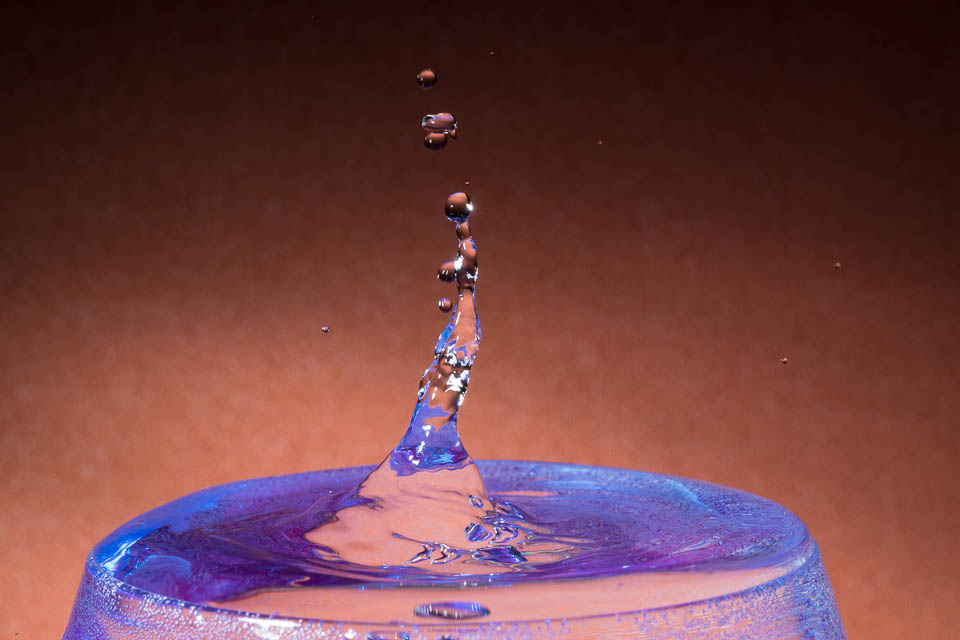
Who would think that a simple water drop or two can make a beautiful photograph?

It’s week three of being stuck indoors thanks to my broken ankle. That doesn’t mean I have to stop being creative. This week I’m going to feature what can be a fun but frustrating type of photography. The humble water drop has been getting bad press for the last few weeks. When there are millions of them they create the weather that photographers hate. When it is just one or two, you can use a simple lighting set-up to create gorgeous photographs.
Water Drop set up
To take water drop photographs you will need to use off-camera flash. The photographs I have taken for this blog were taken with the flash around 30cm from a glass filled with water. Once you’ve got the technique, you can experiment with positioning the light in different places. The glass of water has been filled right to the top, so you’ll need a tray underneath it as there will be splashing! Finally, you’ll probably want some kind of background. Again, you can experiment with different colours and matt or reflective surfaces.
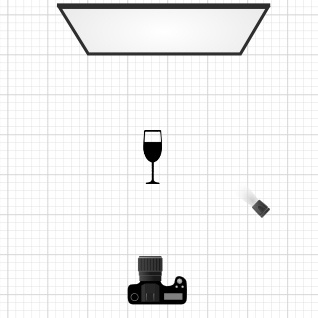
The next thing we need to do is set up the camera. You can either position it level with the top of the water or slightly above the glass pointing downwards. You’ll need to use a longer lens or a macro lens. These shots were taken on a 90mm macro. I’ve set the aperture to f/16 to try and get as much depth of field as possible. Remember, we are shooting close to the water drop and on a long lens so this will make the depth of field fairly shallow. The shutter speed needs to be set at the sync speed for your flash, in my case that’s 1/200th of a second. Finally, I have set my ISO to 100 to get the least amount of noise in the photograph. The amount of light hitting the drop is varied by increasing or decreasing the power of your flash.
Finally, we have to focus on the point where the water drop is going to hit the water. It’s best to aim for the centre of the glass as the water will have more depth there. Hold a pencil in the glass where you are going to drop the water and manually focus on the pencil. If the water hits where you focussed then you should get the maximum sharpness.
You can create more interesting photographs by adding food dye to the water. You could also add different coloured gels to your flash to give a different cast over the entire image. You could also use different coloured backgrounds.
Water Drop manual technique.
This is a low-cost option for creating a water drop photograph. You can create the drops of water in a couple of ways. You could buy (or re-use) an eye-dropper. Hold it above the glass and try and time the drop hitting the water with firing the shutter. It’s hard but possible to time it just right, as you can see in the photograph below.
There are a couple of problems with this approach. Firstly, you can’t guarantee that the drop is going to hit the water where you aim it as your hand will naturally move as you press the eye-dropper. We can kind of fix this but the second issue is that we are using chance to get the moment of impact. You can imagine that there was some frustration with the number of shots that just missed the point of impact or were off-centre to the glass so weren’t in focus!
If you want to try and make the impact point a little more repeatable then you can suspend a plastic bag filled with water above the glass. Create a pinprick in the bag and it will always drop in the same place. You’ll still have the same problem of timing the shutter but at least you’ll be in focus when you get it right!
Water Drop technical solution
Every now and again, I could get good results with the manual technique. It took a while and needed lots of patience. What I wanted was a way to make the triggering of the shutter more reliable. I will say right now that there are other technical solutions but the one I am going to show got results within an hour of unboxing.
The Splash Art MkII Kit is available from Photo Trigger and costs £179. It comes with a stand that holds the automatic dropper, a control box and three wires. One attaches the control box to the dropper mechanism. The second wire goes to a power output. The third attaches the control box to your camera.
The great thing about this system is that you can set the dropper mechanism to trigger not one but two drops. This means that you can create a water drop photograph that looks like a mushroom. The first drop creates the stem of the drop. The second then hits the stem and creates a water drop explosion on the top!
You can control the size of the first and second drops, the gap between the initial trigger and it hitting the water and the gap between the two drops. With a little experimentation (and following the easy to read instructions provided) you can quickly get some great impact water drop photographs.
Give us your feedback
If you’ve got any questions or comments, leave them below. You can sign up for the Edinburgh Photography Workshop monthly newsletter where you’ll get regular updates on interesting things happening in photography and some great tips. Sign up by clicking here.
![]()