November 16, 2022
Tidy your hard drive, edit faster
The more space there is on your hard drive, helps your computer to run faster. How can you keep everything tidy using Adobe Lightroom?
Most photo editing software tools use part of your hard drive to create cache files. These cache files are used to organise the data in your photos so they can run as efficiently as possible. If your hard drive is getting close to being full, it will slow down the editing process. The software has less space to create the cache files, so it can’t organise the data as well as it would like to. For example, Adobe Lightroom recommends that your hard drive has at least 20% of its space available to maximise the editing process. Check how much free space you have, and you’ll maybe see why your editing software is running slowly. This week, I am going to look at a few ways that you can free up your hard drive space to help speed up your editing process.
Ditch your bad photos
Even the best photographers take bad pictures – they just take less of them. There isn’t any need to retain photos you aren’t happy with. The first step to keeping your hard drive as empty as possible is deleting your bad pictures.
After importing your photos into Lightroom, the first task I always do is decide which ones I want to keep and the ones I don’t. Go through the imported photos. If there’s one that you don’t want to keep, press the ‘X’ key. You’ll see a message stating it has been rejected, and there will be a black flag next to the thumbnail. Once you’ve identified all the rejects, go to the Photo menu at the top and take the option ‘Delete Rejected Photos.
The dialogue box that pops up gives you a couple of options. Remove from Lightroom will take the photos out of the Lightroom catalogue but leave them on the hard drive. Delete from Disk will also remove them from the hard drive and pop them into your recycle bin. These are the ‘bad’ photos, so the second option it is.

Move your photos to an external hard drive
If you are anything like me, most of your picture editing takes place on the day you took your photos. If not, then it will be in a few days after. Editing software works best when the photo being edited is on a hard drive rather than an external drive. So the obvious conclusion is that if you’re finished editing and unlikely to do any more, push the photos to an external hard drive and free up space.
If you’re a Lightroom user, you must be careful about moving your photos from your hard drive to an external one. Whatever you do, stay away from File Manager or Finder. Lightroom is a catalogue system, and it links the location on your hard drive with the editing information. If you move the file outside Lightroom, it loses the links and gets confused. Instead, move your files in the Library module of Lightroom.
The first thing you’ll need to do is add an external drive to your Lightroom Catalogue. In the Folders section on the left-hand panel, click on the + sign at the top of the section and take the option ‘Add Folder’. You can now navigate to the external hard drive attached to your computer and press ‘Choose’.
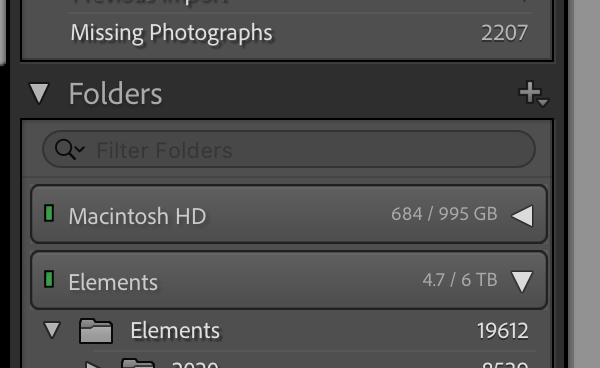
You should now see the hard drive in the Folders section. I have my library set up so that there is a folder for each year. Inside the year is a month folder, which contains a day folder. I usually keep the current and previous month’s photos on my hard drive and move anything older to an external drive. In the example below, I can drag the ‘09’ folder from my hard drive to the 2022 folder on the Elements external hard drive. There will be a warning to inform you that this action can’t be undone. If you’re sure that the files are being moved to the right place, click on ‘Move’. It will take a few minutes to complete depending on how many images you are moving. By moving the images inside Lightroom, all the links are retained.

Don’t keep JPEGs when you have the RAW file
Many of the photos we take today end up on social media sites such as Instagram or Facebook. However, both these sites need your high-resolution RAW files (you do shoot RAW, don’t you?) converting to JPEG or PNG files. That will mean writing a file to your hard drive before uploading. Once you’ve posted the photo, there’s no need to keep it. Make it a habit to delete your social media images regularly.
To help make the task easier, you can create an export preset so that all your social media images go to one folder. Then you can create a recurring calendar entry to remind you to delete everything from that folder.

Offload JPEGs to the cloud
If you take photos for other people like me, you may not be able to delete your edited JPEGs. I use Dropbox to distribute photos to clients, but the problem is that as well as synching the files to the cloud, your photos also remain on your hard drive. A great feature in Dropbox allows you to have the photos available on the cloud but not on your hard drive. Right-click on either the folder or the photos you want to select and take the option ‘Make Online Only’. You’ll still see the folder structure and the files inside them on Finder or File Manager, but the actual data only exists on the cloud.

Please give us your feedback.
Do you have other ways to free up space on your hard drive? If you’ve got any questions or comments, leave them below. You can sign up for the Edinburgh Photography Workshop monthly newsletter, where you’ll get regular updates on exciting things happening in photography and some great tips. Sign up by clicking here.
About the author
As well as running Edinburgh Photography Workshop, Rich Dyson is a professional photographer. His photographs are regularly used in newspapers such as The Times, Guardian and Daily Telegraph. He also had two solo exhibitions and was featured in a members-sponsored exhibition in the Scottish Parliament. You can see and buy his photography at richdysonphotography.com.