April 28, 2021
Get more shots sharper – drive modes
Over the next two weeks, we’ll look at two controls that will help get more sharper images. This week we look at drive modes
It’s been great getting back running the Switch to Manual workshops. I’m glad to say that I remembered everything from the enforced break. I put that down to keeping shooting every day, even when we were tightly locked down. One of the things I like about running workshops is I get questions that can trigger me to explain things I hadn’t thought over. In the last few workshops, a theme has cropped up. New photographers tell me that they’ve managed to get a decent photo by putting the camera on ‘fast shutter’, and at least one shot will be OK. That’s a good use of the law of averages, but it certainly isn’t a repeatable process that can always get good results.
Over the next two weeks, we will look at two elements that will get much more dependable results when we use them together. This week, we’ll start with ‘drive modes’ and then follow this up next week with ‘focus modes’. Once you master these two elements and know when to use them both, you’ll find that you’ll end up with many more pictures that are sharp where you want them to be.
To differentiate between the two, let’s look at the differences between them. The drive mode is the frequency or time between shots when pressing the shutter. The focus mode is where the camera will focus in the frame between the images.
‘Single shot’ drive mode
The day you take your shiny camera out of the box, it is set to the ‘single shot’ drive mode. As the saying goes, it does what it says it does on the box. Pressing the shutter will take one shot, even if you leave your finger depressed on the button. It’s a great way to take landscape photographs, or indeed, any subject that is going to stay static. This drive mode is for when there is no imperative to take subsequent shots immediately after the prior one.
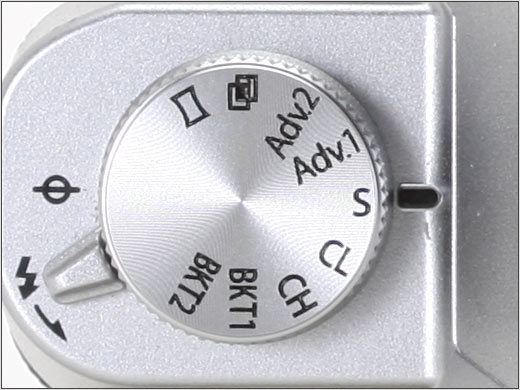
I could spend all day researching the way different camera manufacturers allow you to change drive modes. On Canon, it is usually accessible on the ‘Quick Menu’. Nikon has it on the menu accessed by pressing the ‘i’ key. Sony needs you to dip into the Camera Settings menu, while Fuji has a dial to change the modes. Some camera manufacturers call them ‘drive modes’; others call them ‘release modes’. A quick search of the camera manual (if you can find it) should point you in the direction of the control.
Continuous drive mode
The continuous drive mode (or burst mode in Fuji speak) is what some people refer to as the ‘fast shutter’ mode. If you want to sound like a paparazzi photographer, flick over to this mode and keep your finger on the shutter button. A clacking of the shutter on a DSLR will sound satisfying. However, all it is doing on its own is continuously taking a photograph, one after another.
When combined with the appropriate focus mode, this drive mode is excellent to track a subject moving through a scene. However, it is an easy way to burn through a memory card, and over-use will just add to your editing process (or, as I like to call it, the boring bit of photography).
The symbol for the continuous mode is usually several rectangles on top of each other. On later cameras, there may also be a letter overlaid on the rectangles. H will suggest high-speed continuous, H+ will be even higher speed continuous and even S, a ‘silent’ continuous mode.
Self-timer drive mode
The next drive mode is called the self-timer mode. Named before the ‘selfie’ became a thing, it can be used to take one, but there is another use that you’ll also find helpful. If you are using slow shutter speeds, particularly on a tripod, then the action of pressing the shutter button can cause some vibration for a few seconds. Let’s say the shutter speed is set for two seconds. If the camera is slightly shaking for half of that time, then it will show up in the photo.
There are two ways to fix this issue. The first is to use a mechanical device called a shutter release, fitted into one of the ports on the side of the camera. As the shutter button is off-camera, there is no vibration created, so the image is nice and sharp. However, if you don’t have (or have forgotten) the release cable, you can use the self-timer drive mode to create a delay between the shutter button press and the shutter going down. There are usually two options, a 2-second delay or 10-seconds. Ten seconds will remove any vibration from a shot, and two seconds will generally stop any movement.

Bracket Drive Mode
The final drive mode for this week could be in the same place as the other drive modes in the case of Fuji or Sony. Alternatively, Nikon and Canon have the functionality standing alone from the drive modes. Regardless of the manufacturer, the functionality works similarly.
We might use bracketing when the scene is high contrast. For example, property photographers may use bracketing when they are shooting a room with an outlook through a brightly lit window and dark shadowy areas. The dynamic range of most cameras will struggle with a scene like this, leading to either blown-out highlights or heavily under-exposed shadows. By using bracketing, the camera takes multiple shots. Some are exposed to protect the highlights, while others will be capturing the shadow detail.
There are different types of bracketing available. Some will vary the exposure by changing the ISO, while others will use the shutter speed to collect multiple images. I tend to prefer bracketing with shutter speeds, so we retain the quality of the image. Some cameras will also process the files so you can see a combined image on the back of your camera. Others will just give the individual pictures for you to process. I covered the merge to HDR process back in October 2018.
Be careful when using bracketing to ensure that the multiple shots are aligned. For this reason, it is best to use bracketing when your camera is either mounted on a tripod or stabilised on some other surface.
Give us your feedback
Next week, we’ll cover the various focus modes and show how combining them with the drive modes will help you get super-sharp photos. If you’ve got any questions or comments, leave them below. You can sign up for the Edinburgh Photography Workshop monthly newsletter, where you’ll get regular updates on exciting things happening in photography and some great tips. Sign up by clicking here.
About the author
As well as running Edinburgh Photography Workshop, Rich Dyson is a professional photographer. His photographs are regularly used in newspapers such as The Times, Guardian and Daily Telegraph. He also had two solo exhibitions as well as being featured in a members sponsored exhibition in the Scottish Parliament. You can see and buy his photography at richdysonphotography.com
![]()