October 24, 2018
HDR – Expanding the dynamic range
Using High Dynamic Range can let your camera ‘see’ what you can
One of the most common statements I hear from new photographers is that their photographs don’t look like the scene they can see. There can be various reasons for this, but one will be the dynamic range of the image is greater than the camera can capture. The combination of eyes and the way we process vision results in a dynamic range of around 20 stops (also known as Exposure Values EV). By contrast, the dynamic range of a DSLR will be somewhere between 12 and 15 stops. Most of the time 15 stops of light will cover most scenarios but in particularly high contrast scenes the capability of the camera is going to be unable to deal with the dynamic range. You can, of course, expand the dynamic range by using graduated filters but this will only work where the brighter part of the image is at the edge of the picture. When the brighter part of the scene is spread through the picture or in the centre HDR photography is a good way to capture what we can see.
Shooting for HDR
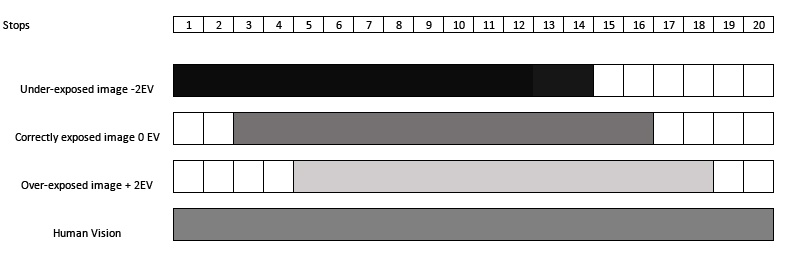
In order to expand the dynamic range of a photograph, we need to start by taking multiple exposures of the scene. It has become the practice to take at least three images, one which is exposed ‘correctly’, one that is under-exposed and a final one which is over-exposed. By combining these three images later in software we can take the highlights from the under-exposed shot, the shadows from the over-exposed capture and the mid-tones from the ‘correct’ image. If a camera had 14 stops of dynamic range by taking three images each two stops different, we would theoretically capture 18 stops of light as shown in the diagram below.
The easiest way to take three images is to use the bracketing feature which is found on most DSLR’s. With this feature, you can dial in how many exposures the camera should take and the number of stops between each image. When using bracketing it is important to ensure that the three images are aligned so even if it’s a bright sunny day it’s still best to use a tripod.
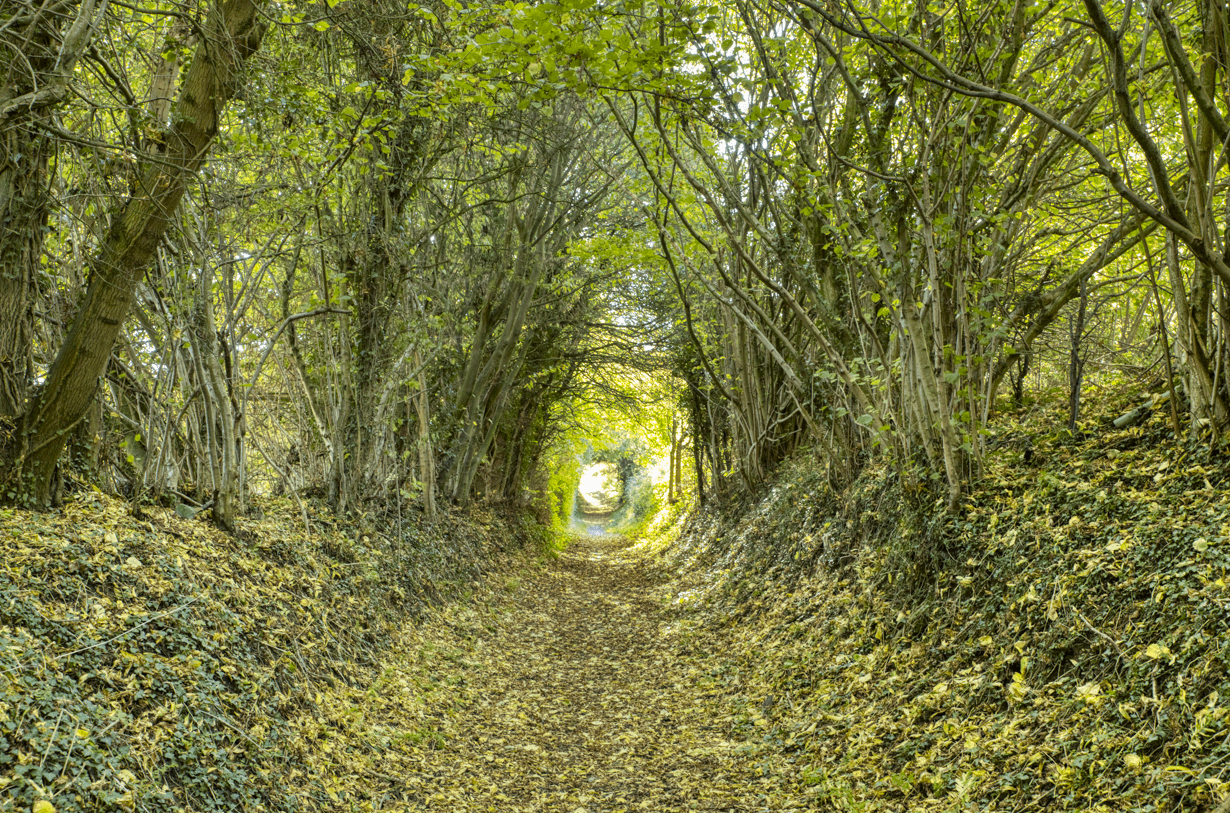
The three shots below were taken of a very high contrast scene. The sun is at its highest point providing harsh daylight coming through the branches of the trees. The pathway through the trees though is getting very little light. In the middle exposure image, both the highlight and shadow detail are lost.
The other two shots have been taken with 2 stops of light difference from the centre image.
In the next section we’ll look at two different ways of using these photographs to produce an image that is much closer to the one that was seen at the time of shooting. The two programs that we will use are Adobe Lightroom and Aurora HDR 2019.
Merge to HDR (Lightroom)
My editing tool of choice is Adobe Lightroom and one of the benefits of the subscription method has been the new features that are added every couple of months. One that was added shortly after the launch of the model and has been improved over time is the Merge to HDR function.
To merge these three files, select all three of the pictures in the filmstrip area (or in the grid if you are in the Library module). Right-click on any of the images and take the options Photo-merge and then HDR, alternatively you can press Shift & H.
Even when images are taken on a tripod the camera may have moved slightly between each image being taken so it’s good to use the option Auto Align. You can also reduce the amount of additional editing by selecting the option Auto Settings which will apply edits to the merged image that Lightroom thinks give the optimal view.

A choice you will need to make depending on the image is the Deghost Amount. This option compares the images and looks for changes between the two (for example if branches or leaves have been moved by the wind). When it detects changes Lightroom will try and replace pixels to prevent the movement being visible. However, any replacement of pixels may result in the image not looking natural, so it is a balance of keeping the ghosting amount to a minimum but ensuring that movement between images is reduced. In this example, I have chosen Medium.
The final option on the screen is Create Stack which will use the Lightroom functionality to stack the three images together with the merged image. Once you have selected the options required click on the Merge button and Lightroom will do the clever work of merging the files.
The benefit of using Lightroom is that the merged file is output as a .DNG file which means it retains all the functionality of a RAW file. The end result looks pretty natural although some of the very lightest parts of the image still have some detail missing.

Transfer to Aurora HDR
The latest version of Skylum’s Aurora HDR was launched at the start of October 2018 and is a dedicated HDR program. It can be used as a stand-alone product or as a plug-in within Lightroom. I’ll demonstrate the latter as that adds in a slightly more advanced step.
Once you have installed Aurora as a plug-in the method to merge the files starts in the same way by selecting the three images. However, this time the way to open Aurora is to take the option File > Plug-In Extras > Transfer to Aurora HDR 2019.
The import dialog box will pop-up and there are a number of options that you can take. The first that is always recommended is to Auto-align the images by clicking the check-box. Then click on the settings gear symbol and three more options are available.
Ghost reduction is similar to Deghost Amount in Lightroom so for comparison, I am going to select Medium again. Color Denoise will reduce the amount of digital noise that is produced in the shadow areas, so it is best to also check this. Finally, Chromatic Aberration Reduction will remove any fringing so again I would recommend this being ticked. Once the options have been selected click Create HDR.

Once the files are merged there are a whole array of options that are available to enhance the image. I am not going to go through each option as there are a number of tutorials available on the Aurora website. For the purposes of comparison, I will use the standard merge which is the Essential collection Natural look.
In the user instructions, Skylum does state that the standard looks may be a little ‘over-cooked’ and they recommend dialing down the effect based on the individual image. This is done by moving the Amount slider down from 100%. A realistic image is gained by reducing down to 50%. Click on Apply when you have made the changes you want, and the image will appear in Lightroom.
One thing to be aware of with Aurora HDR images is that they are moved back to Lightroom as TIFF images so will use some of the functionality that is available with a RAW file but as it is still un-compressed you should be able to extract as much editing capability from the file.
Which is right?
With the two methodologies, we have produced two quite different images. In this example, a blind comparison by someone else who was at the scene thinks the Aurora HDR image was closest to the view that we saw but that may not always be the case for different scenes.
Both Lightroom and Aurora HDR 2019 are available for short free trials so if you don’t use either of these programs at the moment you can experiment with a no-risk trial.