October 31, 2018
Keep it clean
A daily cleaning routine to keep your camera and lenses in top shape.
As we start to get into the Autumn and Winter the Golden and Blue hours are at reasonable times of the day so it’s easy to get out and shoot at the best times of the day. It’s tempting to head into the hills or by the shore to get superb subjects. However, they are also the environment where you are going to get the most dirt and grime which can affect your camera and lenses. I always try to undertake a thorough cleaning regime at the end of each day when I have been shooting. It will only take 15 or 20 minutes each day. As well as helping your equipment perform at its best it will also help to retain the trade-in value of your camera.
Cleaning Kit
If I am traveling, I carry a small cleaning kit with me which fits into a small zip-lock plastic bag. I decant the various cleaning solutions into 50ml bottles which means that even if I am flying then I can still keep my gear clean. The kit consists of;
- Pure Isopropanol Alcohol used to clean the camera body and exterior of the lenses
- Tiffen Lens Cleaner for cleaning the glass elements of the lenses
- Eclipse Cleaning Fluid for cleaning sensors
- Matin Lens Cleaning tissues
- VSGO Sensor Cleaning Swabs
- Sensor Magnifier to check for dust on your camera sensor
- A few clean microfibre cloths
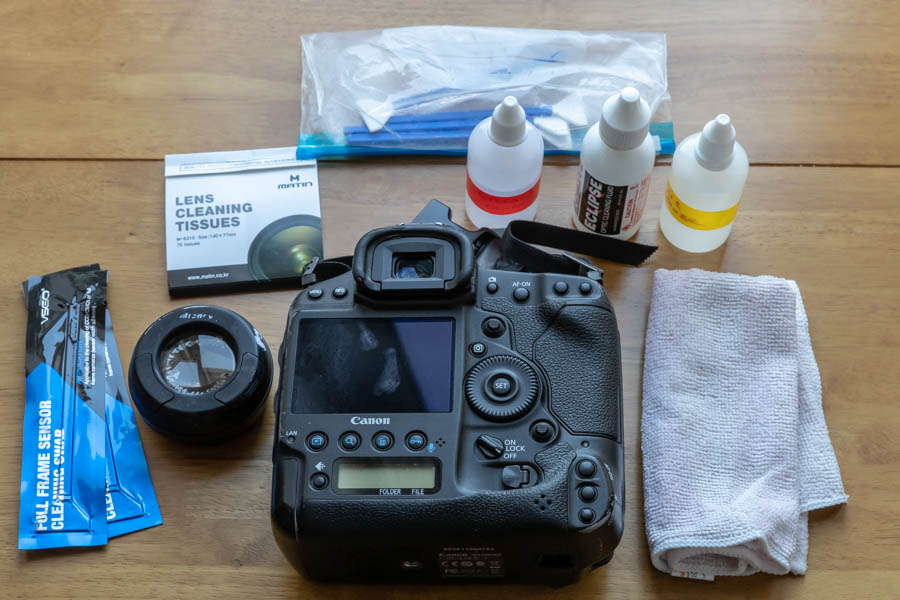
This small collection gives you everything that you need to keep your camera, lenses, and filters nice and clean.
Camera Body Clean
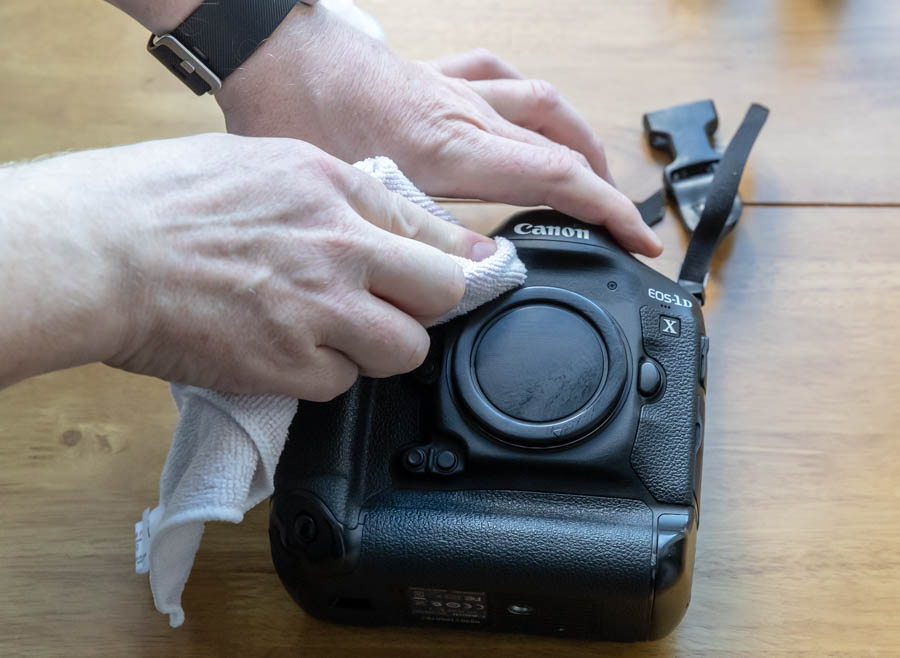
The first thing we are going to clean is the outside of the camera and lenses. The reason for doing this is that your hands contain grease which can build on the body. This build-up of grease will attract dust and that can get inside your camera and cause problems.
Add a few drops of the Isopropanol onto a clean microfibre cloth and methodically work your way around the camera. You can rub quite firmly, and you’ll be surprised at how much grease will come off your camera, even if you clean it every day.
Once you have cleaned the outside of the camera you can then concentrate on the harder to clean areas. The eye-piece usually has a cup in front of it. Un-hook this and clean the eye-piece, the cup and inside the eye-piece. Be careful when cleaning here as it is easy to accidentally move the dioptre which adjusts how you see through the eye-piece. Give it a check before you put the eye-cup back on. I always travel without lenses being attached to the camera, so I always give the body cap a clean, particularly inside as any unclean material on here can drop right into the mirror and sensor of your camera. Finally, if there are any buttons and dials that are hard to clean then used an old sensor swab coated in the Isopropanol.
Camera Sensor Clean
You should now have a nice and clean camera which should be fine for most daily cleans. If you are starting to see dust spots on your pictures, then it might also be worth giving your sensor a clean. Some people will recoil in horror at the thought of cleaning sensor but once you have done it a couple of times, you’ll soon regret having paid a camera shop to do it for you!
In order to get to the sensor, you will need to take the menu items that will lock the mirror, so the sensor is accessible. You should check your camera manual for the menu items needed but if you are struggling to find it, please feel free to send me a mail along with the make and model of your camera and I’ll try and help. Before cleaning also make sure that your battery is fully charged as one of the few ways that you can damage your sensor is if the mirror closes whilst cleaning due to the battery running out.
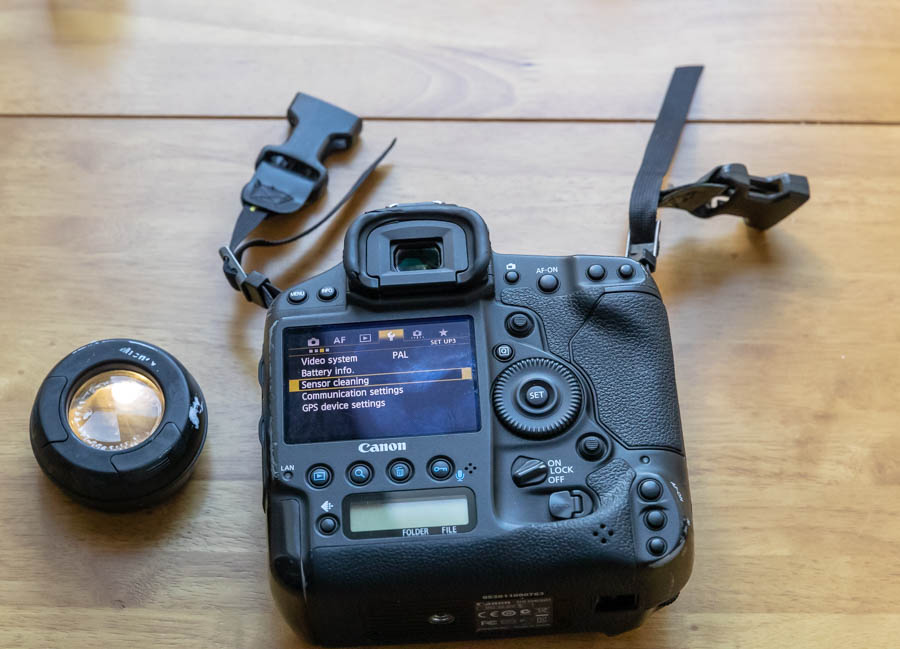
Once the menu items have been taken the mirror inside your camera will have flipped upwards to reveal the sensor. You can use the Magnifier to identify if and where the dust is on your sensor. Before attempting deep cleaning of the sensor, it is worth using an air blower to try and remove large parts of dust – take care that the blower doesn’t actually touch the sensor. Hold the camera pointing downwards and blow the air toward the sensor. Check to see if this has moved any dust that was visible.
If there is still dust on the sensor then it is time to carry out a deep clean using the sensor swab. The swabs come in different sizes (usually full frame or APS-C) so you should ensure that you purchase the right sized swab for your sensor. You should only use a swab once so slide it out of the holder and add one or two drops of the Eclipse Cleaning Fluid onto the swab – too much fluid can cause smearing on the sensor. Lower the swab toward the sensor and allow it to settle on one of the short sides of the sensor and then apply some pressure to the swab and move it in one movement to the other edge. Turn the swab over and then do the same in the opposite direction. This should have removed all the dust on the sensor and you can check by using the magnifier. If it hasn’t then repeat the steps again but remember to use a new swab.
Lens Clean
The final cleaning step is to clean any lenses you have used during the day. We’ll begin by cleaning the outside and caps of the lenses which, once again, is done using Isopropanol. Clean the outside of the lens first removing any grease that has been left by holding the lens. Next, remove the front and rear caps and clean them – take particular care to clean the inside parts as they will be the closest to the glass elements of the lens. Before we start cleaning the glass also gently rub the alcohol solution on to the contacts of the lens – don’t apply too much pressure on them as this can cause damage if too much is applied.
The final stage is to clean the two glass parts of the lens. Blow any large pieces of dust with an air blower. Next, take a sheet of the cleaning tissue and fold it in half twice so that it forms a small rectangle. Apply one drop of the Tiffen Lens Cleaner to the centre of the front lens. In a circular motion starting in the middle of the lens allow the tissue to spread the fluid across the area of the lens.
Unfold the cleaning tissue and re-fold so that the dry sides can polish the front lens and you should now have a dust and grease free lens. To finish apply the same steps to the glass at the back of the lens. It may be necessary to zoom the lens so that the glass is easier to clean.
By taking these steps it should keep your camera and lenses in really good condition and should ensure that you don’t need to spend time removing dust spots from your photographs.