May 22, 2019
Texture Control in Lightroom Classic
The latest update of Lightroom Classic has added a brand new feature, Texture Control
When Adobe moved to the subscription model there was a lot of scepticism that it was a money-making move. One of the promised benefits that are getting delivered is that there would be regular updates. Adobe has just launched two fairly significant changes in the May 2019 update. The first is that the Creative Cloud badge has been dropped from all Lightroom versions. Creative Cloud is now back to being the means to download updates and other Adobe products. The second is the first new tool being made available in Lightroom Classic for about two years. The Texture Control is going to give an option to increase or decrease the amount of texture in elements of the image.
Where is the Texture Control?
Once you have updated to version 8.3 of Lightroom Classic there are a few different places that you can use Texture Control. The four places where it is now available are in the Basic section of the Develop Module and also in the Graduated Filter, Radial Filter and Adjustment Brush tools. For this blog, I’ll cover the two that I could see myself using most of all in a little more detail.

What is Texture Control?
There are already a couple of tools in Lightroom that can change the amount of detail seen in an image. The Clarity tool and Dehaze tools can both add more or less impact to an image and sharpening can make edges clearer so why is there a need for another tool? Max Wendt, the senior engineer at Adobe that led the team who designed the new tool, writes
“You may notice that Texture shares some characteristics of other controls. One of the most common responses to positive Texture (the range from 1 to 100) is “it’s somewhere between positive Clarity and Sharpening.” Negative Texture (the range from -1 to -100) is sometimes compared to Noise Reduction. So just what is Texture doing? To understand that, let’s explore a term you may have heard before: image frequency.
Just like you can break an image into color channels (for example; red, green, and blue), an image can also be broken up into different “frequencies.” There are high frequency details, mid frequency features, and low-frequency areas; together, they all make the image.”
Sharpening would help with the high frequency details whereas the Texture control is going to work most of all over the mid-frequencies. The best way to show the differences is with some examples.
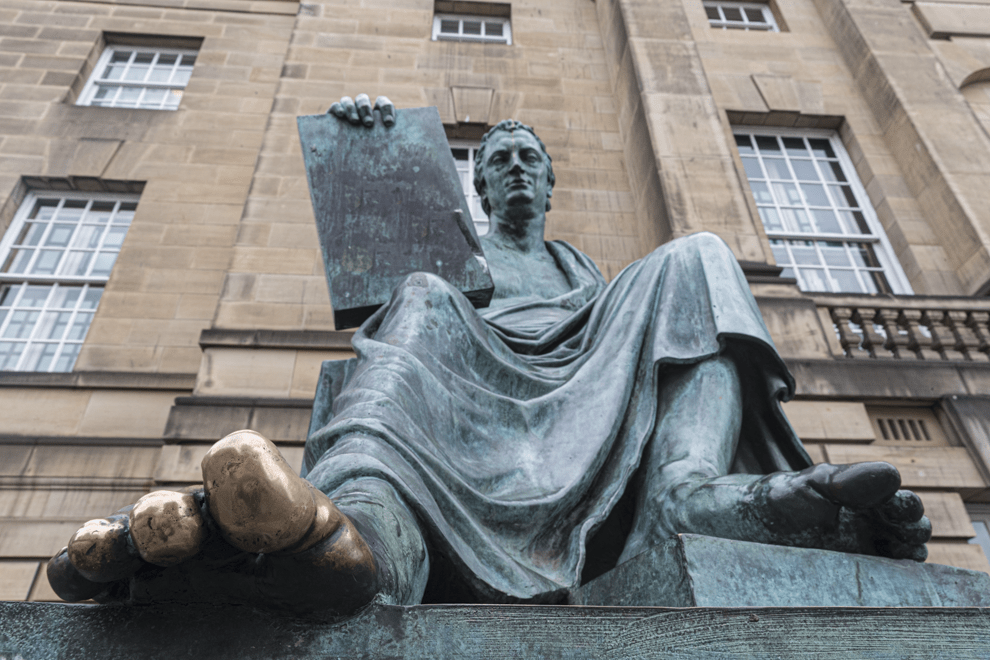
Texture Control v Clarity Control
To show the difference between the new tool and the Clarity Control we’ll use this photograph of the David Hume statue in Edinburgh. It’s a great subject on both our Switch to Manual and Night Photography workshops. I’ve chosen this image as there is plenty of areas where texture can be accentuated such as the bricks in the wall behind the statue as well as the folds of Hume’s toga.
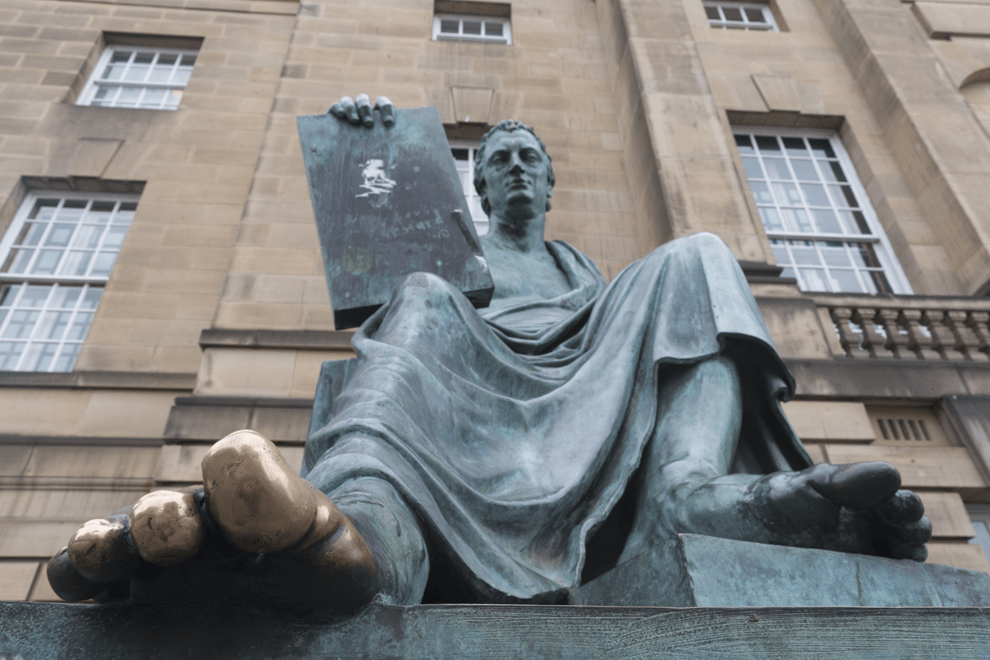
We’ll now compare applying 100% Clarity on the left image with 100% Clarity on the right. You can use the slider to see different parts of the image. The clarity tool applies a much greater level of texture to the overall image. The shadow detail has been strongly accentuated and the highlights have been brought out much more. The texture control has provided a far more subtle result with extra detail being brought through in the brickwork but with far less impact on the shadow and highlights.
By comparing the histograms of the three images we can see how the changes have affected the distribution of the data. The chart on the left is the original image, in the middle is the 100% clarity and on the right is the 100% texture. It is quite clear to see that the Clarity control has moved both the highlight and shadow data further apart and increased the intensity (height of the graph). The texture slider has largely maintained the distribution across the highlights and shadows but increased the intensity, particularly in the mid-tones.
Texture Control with the Adjustment Brush
The images above show how the new Texture Control feature can enhance the textures across an entire image. The control has also been made available in three of the other tools in the Develop module and the one I will use most of all is the Adjustment Brush tool. If you’ve never used the adjustment brush then you are missing out on a very powerful editing tool. You can paint changes onto your image in the areas that you want to apply them to. A great way of using the texture control is to help with skin smoothing in your post-processing. To do this we are going to do the reverse of the Hume image and apply negative Texture and Clarity to the image. The original shot which was from the same shoot as the two-light headshot blog is below.
This time, I’m going to use the controls at -50% because over-cooking the negative controls can lead to an un-natural plastic looking effect on skin tones. I always want to edit in a way that allows skin to look like skin. To do this I am going to use the adjustment brush to paint where I want the smoothing to be applied.

I’ve placed the two images side by side again with the -50% Clarity control on the left and the -50% texture control on the right. This time the difference is a lot more subtle. In my opinion, the texture control has retained some of the light shadows around the model’s jawline which shows off her great cheekbones.
As part of the latest update, Adobe has also introduced a new pre-set in the adjustment brush tools called Skin Smoothing (Lite) which actually adds -35% of Texture Control and -15% of Clarity Control which gives a nice natural look which you can see below compared with the original image.
The best way to see the benefits of this new tool is to try using it on your images. It would be great to see what you have made of the new tools by sending them to contact@edinburghphotographyworkshop.com and I’ll add them to the clients’ gallery. Please sign up for the Edinburgh Photography Workshop monthly newsletter where you’ll get regular updates on interesting things happening in photography and some great tips. Sign up by clicking here.