October 14, 2020
Setting up the Canon R5 and R6
Make your new camera work for you with the perfect all-purpose set-up for stills shooter using the Canon R5 and R6
I’ve finally taken delivery of two new cameras, the Canon R5 and R6. After much deliberation, I have decided to replace my two Canon 1DX’s with the new mirrorless offerings from Canon. Many press or PR photographers use two cameras. One has a wide-angle lens (either a 24-70mm or a 16-35mm) and the other with a long lens such as the 70-200mm. The reason for this is that I want to be ready to shoot either long or wide without having to switch lenses. I had thought about buying either two R5’s or two R6’s, but in the end, I decided to go for one of each. Side by side, the two cameras are pretty much identical so there wouldn’t be an issue in hunting for buttons as I switch between the two. I have the R5 so clients that will be printing my photographs on a large scale will have plenty of pixels to use. The R6 was a cost-based decision; there was £1400 difference between the two.
Now I have the cameras the first job was to set them up so that they make my job as easy as possible. One of the enormous benefits of the R5 and R6 is how easy it is to customise the set-up just how you need it. I’m going to share the customisation I have made to both cameras. I can replicate the settings on both as I rarely shoot video and the only real differences between the two models are a bigger sensor and 8K video on the R5. If you shoot video, then you may want to tweak this set up to help it work better for you.
Shooting Menu
I’ll go through the various menus and describe the changes I made and the rationale for them. I’m not going to explore every setting, just the ones that I have changed. We’ll start with the Shooting Menu, which is the red set of options after pressing the Menu button. The first change is to change the Image Quality to RAW. You can read about the benefits of RAW over JPEG on my blog at http://bit.ly/EPWBlog46.
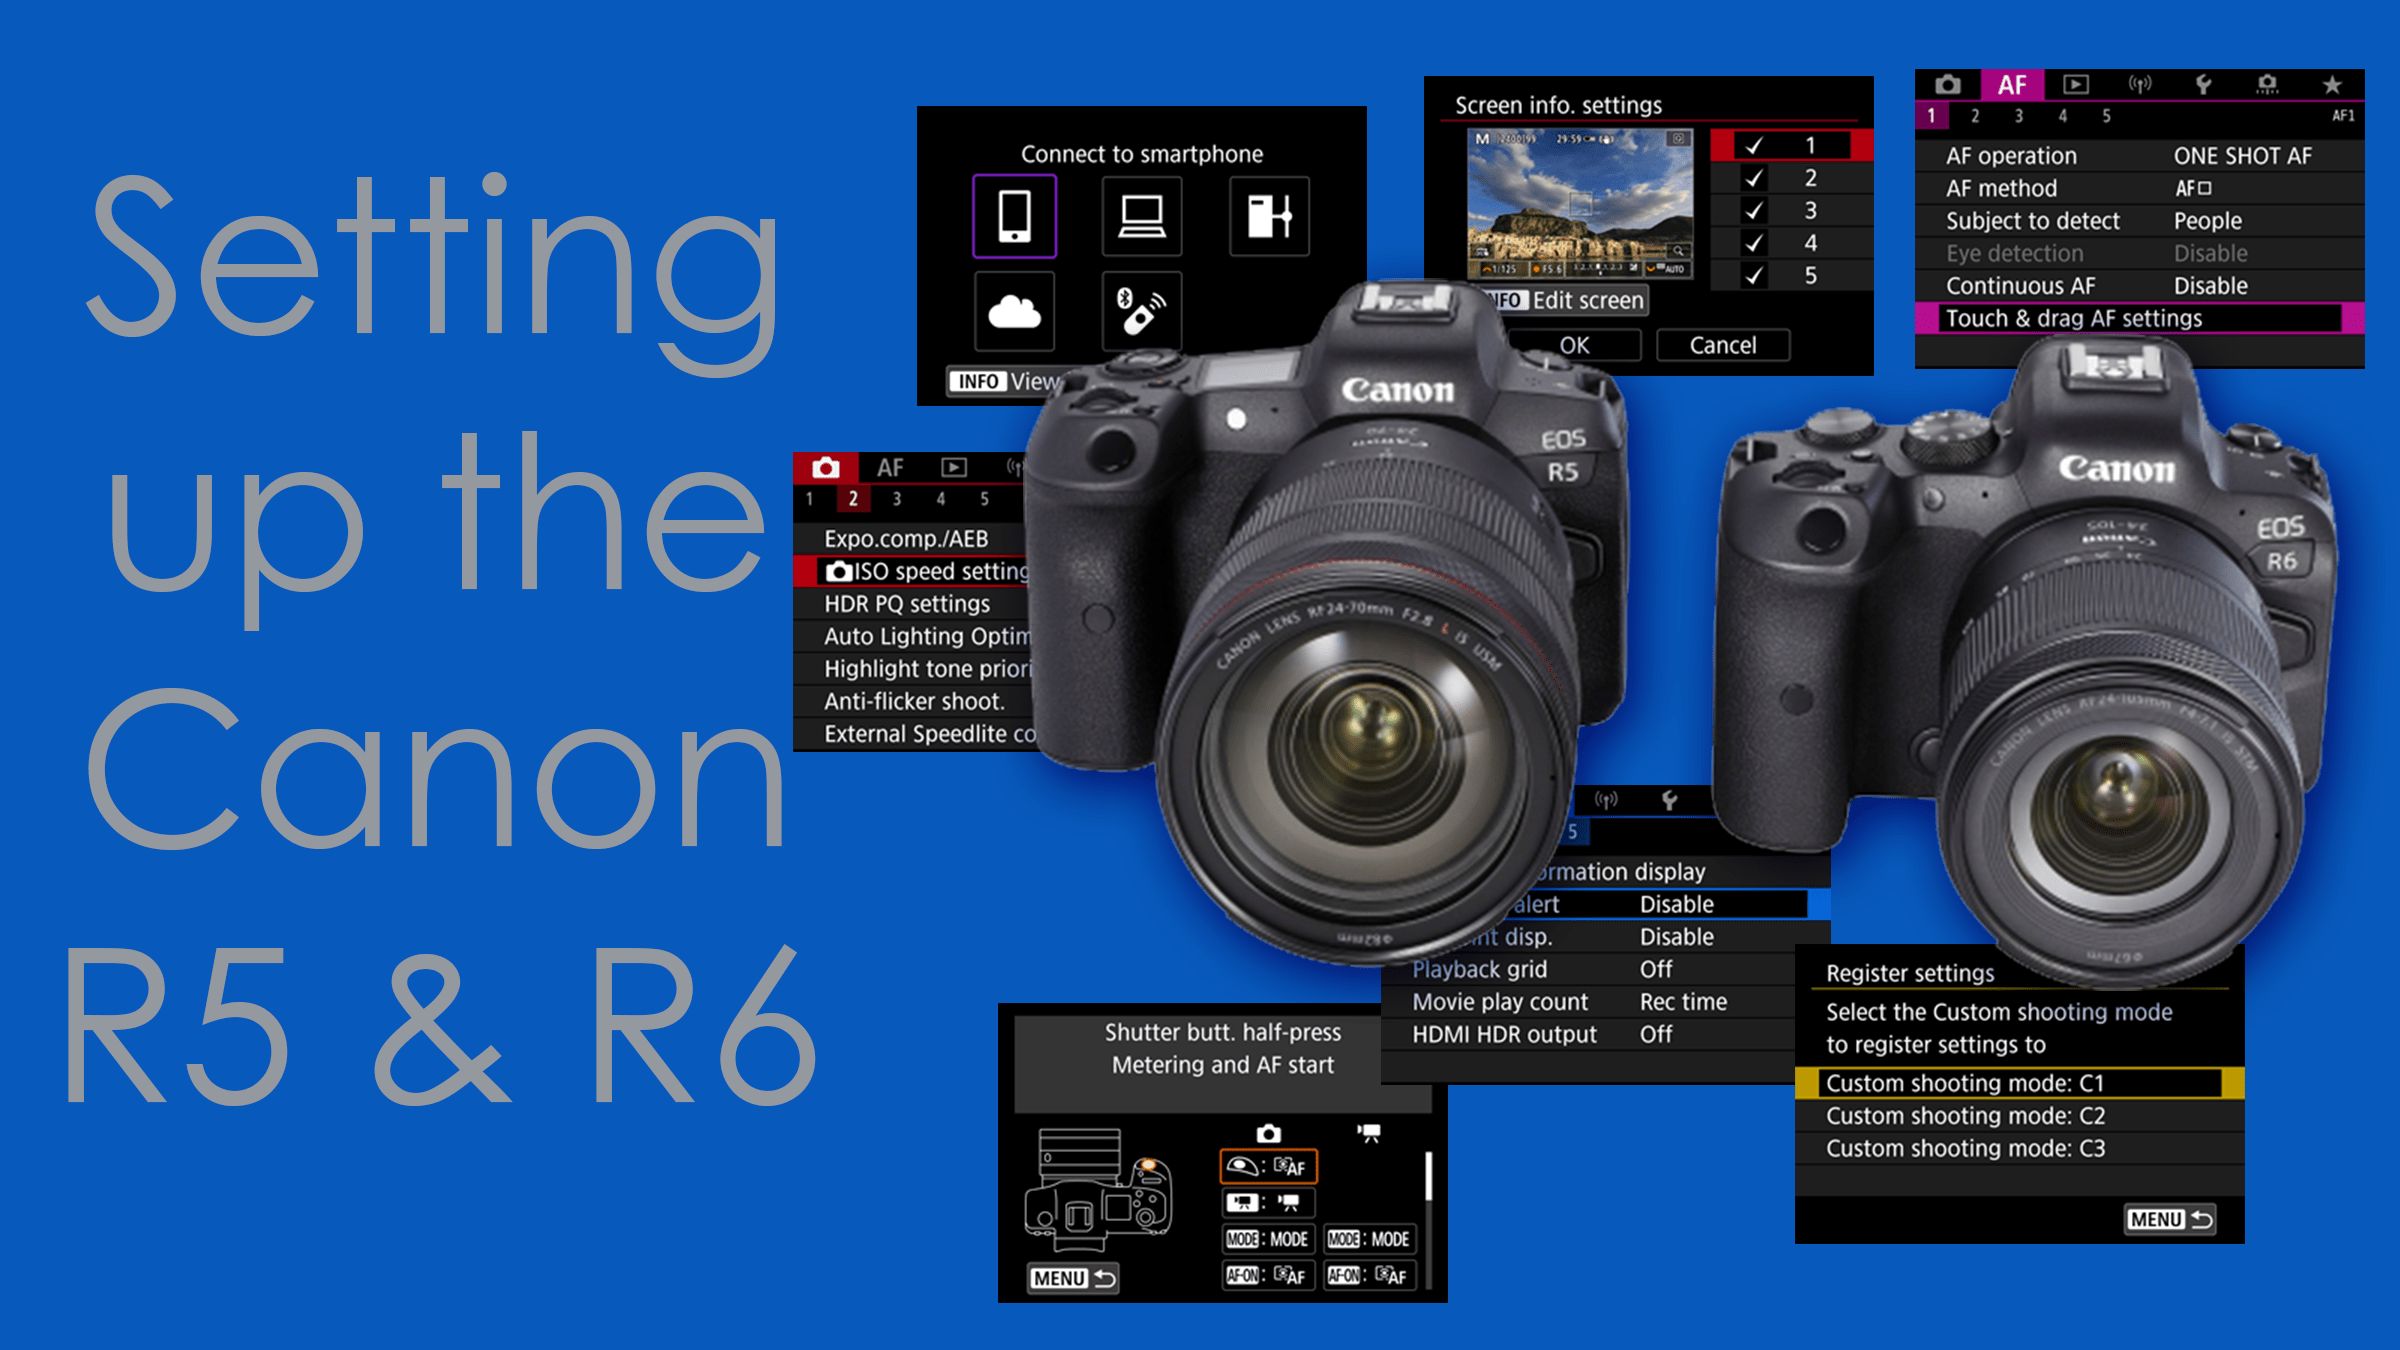
On the next page of the Shooting Menu, I will make a tweak to the ISO Speed settings and mainly the ISO speed range. It comes with the minimum ISO at 100; however, it’s possible to extend to a value of L, which is the equivalent of an ISO of 50, or one-stop darker. I find this useful when shooting landscapes, and I may want to get a more prolonged exposure, say to smooth water. Using the L setting will double the exposure length without the need for an ND filter.
On page three of the shooting menu, I like my White Balance set at Daylight. While this is a change that isn’t necessary as I shoot in RAW, I much prefer to view a consistent white balance rather than letting the camera decide what it will apply using the AUTO function.
The next change is on page six and switches off the option, “Release shutter without card”. Imagine you turn up last-minute for a shoot and start snapping away only to discover that the memory card is still in the card reader. Having the option switched to the off position, at least gives you a warning and I am sure you’ll have a spare card in your pocket to save the day. Also, on page six, I set the Shutter mode to Mechanical. While the Electronic shutter is totally silent, the mechanical shutter is barely audible. It has many benefits over the electronic shutter, mainly that the slowest shutter speed in electronic mode is 0.5 seconds which is no good as a landscape photographer.
On page seven of the menu, I make a change to the Image review options. I don’t need to have the photo just taken pop-up on either screen or the viewfinder after each shot. Remember, every time the screen on the back of the camera is working it is using battery power, so the less it is on, the better for extended battery life. I set Review duration to Off and Viewfinder review to Disable.
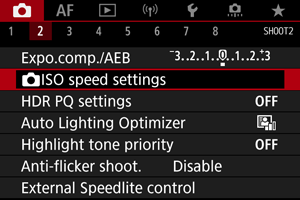
While we are on page seven, there are some significant changes to the option at the bottom of the screen, “Shooting info. disp.” Inside the menu, take the option “Screen info. settings”. Here you can change the various screen that you can toggle through by press the Info button. I remove the tick for options 1 and 2 as I always want to see a histogram on the screen. Moving the cursor to option 3, press the Info button and you can tailor this view even more. I chose to remove the Detailed shooting info from the screen so I can see a little more of the image than the various settings. Menu 4 and 5 are left switched on so that you can either see just the image or the Q menu screen. I prefer to see an RGB histogram instead of a brightness one. You’ll see the benefit of this when shooting sunrises or sunsets as you can avoid blowing out highlights in the red channel, which may not be visible using the Brightness histogram.
The final page of the Shooting menu needs just one change, which is to set the Disp. performance setting to Smooth. While this uses a little more battery, it’s a beneficial trade-off if you’re shooting a moving image as the viewfinder display will be a lot more natural.
Autofocus Menu
The Canon R5 and R6 have used the revolutionary auto-focus system as its USP. As you can imagine, there are quite a few settings that you’ll want to change in the AF Menu. Let’s start with page one.
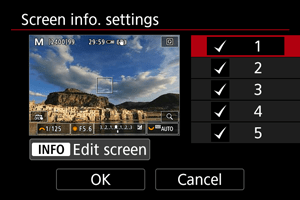
I set the AF operation to SERVO AF. Later, I’ll set up back-button focusing, and this setting means that I can either focus on a static object or a moving subject without needing to change anything. I initially set the AF method to 1-point AF as I probably do more landscape work than moving subjects, so this works best for me. However, we’ll also look at ways to make this an easy change shortly when shooting something moving. The Subject to detect menu is set to People. Again I mainly shoot humans rather than animals, so when I am going to trust the autofocus, I want the camera to know it’s looking for people’s eyes and not an animal eye.
Finally, I set up the Touch and drag AF settings. It’s handy to be able to use the back-screen to change the focus point exactly where you want it by dragging it with your thumb. However, you also don’t want to have your nose changing the focus point as it pushed against the screen. You can do this by setting ‘Touch & drag AF’ to Enable, ‘Positioning method’ to Relative and ‘Active touch area’ to Top right. Now the top right of the screen is set so that you can use the thumb to drag the focus point quickly and easily. That’s all the change to the AF menu’s; the remaining four pages can be left at the default options.
Play Menu
There’s very little that I need to change in the blue Play menu. The first tweak is on page 4. When I press the magnification button when reviewing images, I am usually checking for sharpness. To ensure I see the picture as close as possible, the Magnification (apx) option is set to Actual size.
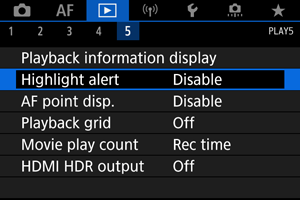
The next set of changes are on page 5 starting with the “Playback information display”. There are a plethora of views you can see by pushing the joystick down when reviewing images. However, many of them are things you’ll probably not be too interested in, such as the White balance shift and Sharpness settings. You can now remove the ones you don’t want to see. For me, the ones I will use are 1, 2, 3, and 10. That shows me the photo, the settings, an RGB histogram and GPS data. Also on this page, I set the “Highlight alert” to Enable, and I like to have the 3×3 ‘rule of thirds’ grid selected on the ‘Playback grid’ option.
Wireless Menu
One of my biggest bugbears with the mirrorless cameras from Canon is carried forward to the Canon R5 and R6. I like to be able to find where I took a shot by using the GPS function. In the 1DX MkII, it was built into the camera and worked away happily in the background. The R range of camera has moved to use your mobile GPS to interact with the Canon Connect app, which connects using Bluetooth or Wi-Fi. It can be annoying when Location logging has been switched off on the app, and the GPS position isn’t recorded.

To use GPS, you’ll need to set up the Wi-Fi connection to Bluetooth. There’s a bit of a process to go through, but the on-screen instructions are easy to understand, and it works much more reliably than the old Fuji Connect app that I had with the XT-1. Once connected, you’ll need to enable Bluetooth Settings and then go to the ‘GPS device settings’ menu and take the option Smartphone in ‘Select GPS device’.
Settings Menu
The yellow Settings menu needs surprisingly few changes. I created a custom file name in the menu and, of course, set the date and time (although when connecting to Bluetooth you’ll be offered the option to synchronise the time to that on your phone). The only other options I need to adjust here are to create a couple of Custom shooting modes.
To create a custom mode, you’ll need to set the camera to the settings you’d like the mode to reflect. For example, when I am shooting landscapes, I’d want my aperture to be f/11, the shutter speed about 1/25th, ISO at 100, a single focus point and the shutter to be set at single shot. Dial in these settings and then inside the Custom shooting mode (C1-C3) menu item take the option to Register Settings, and you can then decide which of the three custom settings options you’ll apply the settings to.
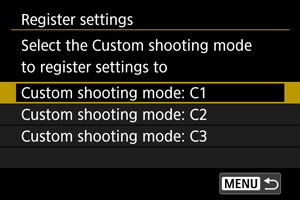
I also created a ‘wildlife’ custom setting which had a shutter speed of 1/1000th, aperture to f/2.8, ISO to Auto, the AF method to eye recognition and tracking; I changed the eye detection to animals and the shutter action set to H+. I can then quickly switch to these starting positions by turning the Mode dial on the R6 or pressing the Mode button on the R5. Once you get used to using Custom Modes, you’ll be able to switch between different types of shooting quickly.
Custom Functions
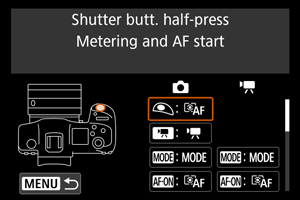
The orange menu is badged as Custom Functions, which feels a little dated with all the customisation we have been able to do in the five previous menus. However, there’s very little we need to do in this menu. The first page we need to go to is page three. It’s here that we can set up back-button focusing. You can read the benefits of this at http://bit.ly/EPWBlog6
Take the option ‘Customize buttons’ and change the Shutter button to the asterisk option, which is AE lock. This now makes the shutter button, just a shutter and removes the ability to half-press to focus. Also, change the AF-ON button to Metering and AF start. This makes the AF-ON button start to focus. If you press and release the button, it will be focussed wherever the focus point was when the button is pressed. However, holding the AF-ON button down will allow the focus to be tracked on a moving object.
Next, we are going to change the way the camera is set-up to change the ISO and aperture. Out of the box, Quick Control Dial 2 will change the ISO and the Quick Control Dial 1 changes the aperture. If I am doing press work, I will usually have the ISO set to Auto so by swapping these two dials around; my fingers will do less travelling between the AF-ON button and the top dial than moving down to Quick Control Dial 1. You can change the dials in the ‘Customize dials’ option.
My Menu Tabs
The final bit of customisation is to set up some custom menus in the green My Menu section. This means you can put the most used menu items onto your own Menu’s. It’s a great way to save time scrolling through the thirty different pages at the top level to find the menu item you need.
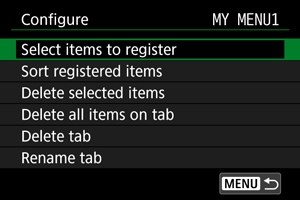
To add a new My Menu Tab, take the option ‘Add My Menu Tab’ and then take the option to Configure and then ‘Select items to register’. From here you can add any of the menu items on the previous menus to your customised screen. I have two screen set-ups. They are as follows;
My Menu 1
Format Card
Subject to Detect (so I can switch between People and Animals)
External Speedlite Control (which allows me to set up a flash more easily)
Bulb Timer (great for long-exposures beyond 30 seconds)
Playback grid (so I can switch off the grid on the back of the camera)
Highlight Alert (again, so I can switch on and off quickly)
My Menu 2
Interval Timer (handy for shooting time-lapse images)
HDR Mode (for the odd occasion when I shoot HDR)
These eight items are the ones I am going to use most often, and so in the main, I’ll only ever need to stay on these two menus without going through the other 30 pages.
Time to shoot
That’s the main settings you’ll need to customise on the Canon R5 and R6. As I said earlier, these settings are very much tailored to a stills photography shooter. If you shoot video, there are a whole lot more settings that you’ll want to tweak. I’m going to be shooting on these two cameras for a month or so, and then I’ll share my experience of using them. In the meantime, I’ll be outing the two workhorse 1DX cameras on the market. They are indestructible and still great cameras, but they’re also heavy objects, so I am looking forward to literally taking the weight off my shoulders!
Listen along
If you don’t feel like spending time reading these blogs, you can now listen to them instead. Head to your usual podcast providers such as iTunes or Google podcasts and search for The Edinburgh Photography Workshop Podcast. If you do like listening, please subscribe to hear it every week and leave a review. That helps others to find the podcast as well.
Give us your feedback
If you’ve got any questions or comments, leave them below. You can sign up for the Edinburgh Photography Workshop monthly newsletter where you’ll get regular updates on exciting things happening in photography and some great tips. Sign up by clicking here.
![]()