April 6, 2022
Photoshop Selections – Part 1
Making selections is one of the most powerful skills in Adobe Photoshop, but it can also be complicated.

A couple of weeks ago, I ran a private one-to-one workshop on Lightroom and Photoshop. During the session, we wanted to keep part of a photograph in the original colour and make the rest of the image monochrome. We could use some specialist software such as Silver Efex to do this. Alternatively, we can take the picture in Photoshop and use the selections tools to do the same thing.
The problem with Photoshop is that whilst it is immensely powerful, it’s not particularly user friendly. Over the next couple of weeks, I will cover some of the various ways that we can use selections and try to explain the benefits of each one. This week we’ll start with the most simple form of selections – the Select menu.
Colour Range Selections
This week, the four selections I’ll cover are accessed from the Select menu in the menu bar. Click on Select and the four we’ll use this week are in the third group of tools.
The first of the four is ideal for the original challenge in the private workshop – selecting a single colour in an image. We can then make it ‘pop’ by de-saturating the rest of the photo. Let’s start with the original image taken on the recent Social Meet-up that subscribers to our monthly newsletter could attend. We’ll select the Forth Bridge and then make the rest of the shot black and white.

Take the option Color Range from the Select Menu, and a pop-up is displayed. The first drop-down we can use defines the type of colour selection we will make. It can either be an area of the photograph that we sample, skin tones, or a colour/tonal range. The first two of these can be refined later, but the colour/tonal range adjustments are fixed, making them less accurate.
For this photograph, let’s take the option ‘Sampled Colors’. If you select multiple colour ranges in the image, select Localized Color Clusters to build a more accurate selection. In the pop-up box, you can see a small preview of the selection, which you can view either as the Selection or the Image by clicking the two checkboxes. You can also toggle between the two views by pressing the command key on a Mac or Ctrl for Windows.
We can now use the eyedropper tool to either click on the small preview or the actual image to select a colour (in this case, the red of the bridge). I have started by clicking on one of the bright red struts, which does a great job selecting most of the bridge. However, it hasn’t quite got all the bridge selected. I can move the fuzziness slider to determine how wide a range of colours is in the selection. The other option is to add to the selection by clicking on the eyedropper tool with a ‘+’ sign next to it (you can also hold down the shift key) and sampling one of the areas in the shade. If you select an area by mistake, click on the eyedropper tool with a minus sign (or hold down the option key on a Mac or Alt key on Windows) and de-select a colour.

Four different views are available in the Selections Preview drop-down box to see what is selected on the image.
Greyscale shows in white the selected pixels and black anything that isn’t in the selection.
Black Matte shows the original image for selected pixels and black for the rest. It works best for brighter images.
White Matte does the reverse and still shows the original image for selected pixels and white for unselected areas. Use this option if the image is darker.
Quick Mask shows unselected areas as red (or rubylith) overlay. That works well when you aren’t selecting reds. If you are, then you can define the colour unselected areas will be shown in the Quick Mask Options dialog box.
For this photo, I think Greyscale or Black Matte work the best. Try each one to see which is better or worse, depending on the image you are editing.
If this colour range is going to be used many times, you can save these settings by clicking on the Save button and re-load them with the Load button. In this case, we have selected the bridge, but we will desaturate anything that isn’t red. Check the Invert box, and our selection is now anything that isn’t sampled, and click OK. The running ants show the area that has been selected, so we can now apply either a Black and White or Saturation adjustment layer to the selection, which will desaturate the chosen area.

Focus Area Selections
The next of the four selections for this week is the Focus Area. An example of where this could be used is where you have a strong subject, and you’d like the background to be more blurry. The shot we’ll use is a place I cover in the Switch to Manual workshop. The golden hawk sits above the door of Gladstones Land on Edinburgh’s Royal Mile.

From the Select menu, take the option Focus Area… Photoshop will take a best guess of what is in focus and apply a view of the image with the area selected if the preview box is ticked (I recommend it). You can toggle through the views by pressing the ‘F’ key. My preference is the Overlay view, where the selected area is shown with the actual colours and unselected is shown in red.
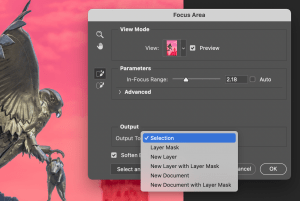
If there are some areas of the photograph that you don’t want to be included in the selections, there are a few ways to refine them. Manually adjusting the In-Focus range slider will add or subtract to the selection. You can also paint in or out areas to be selected onto the photo. Clicking on an area will add to the selection, pressing the Shift Key, and clicking will remove it from the area. When you have a good selection, you can choose how to use the selection from the dropdown box. In this case, I used a New Layer with Layer Mask. I then applied a Gaussian Blur filter to the background layer to give a wider bokeh effect to the final image.

Subject Selections
The next selections tool is excellent for selecting a clearly defined subject, such as a person or an item. This time I want to make a selection of recent attendees of a Switch to Manual session so I could use them in an imaginary advert.

Take the option, Subject from the Select menu, and Photoshop will do a pretty good job selecting the three people. Take the option Select and Mask from the Select menu to refine the selection. It will also be visible if you have a selection tool selected. You can use the Quick Selection tool to add to the selection by painting on the image. Again, press the shift key, which will remove it from the selection. Decide on the output type and click on OK.

As you can see, the combination of these two tools creates excellent selections, and it drops very neatly onto my dummy advert.

Sky Selections
The final selections tool for this week will be short and sharp. Why? Since this tool was introduced into Photoshop, it’s now been migrated over to Lightroom. I can’t see why I’d take a photo from Lightroom to do anything in this space, but just in case you feel the need, I’ll include it in this week’s blog.
Once again, we’ll go to the Select menu and this time, take the option Sky… Photoshop does a fantastic job of selecting the sky in the photo (in the same way that Lightroom does). You can then apply any changes to the sky using the tools in Photoshop.

Please give us your feedback.
If you’ve got any questions or comments, leave them below. You can sign up for the Edinburgh Photography Workshop monthly newsletter, where you’ll get regular updates on exciting things happening in photography and some great tips. Sign up by clicking here.
About the author
As well as running Edinburgh Photography Workshop, Rich Dyson is a professional photographer. His photographs are regularly used in newspapers such as The Times, Guardian and Daily Telegraph. He also had two solo exhibitions and was featured in a members sponsored exhibition in the Scottish Parliament. You can see and buy his photography at richdysonphotography.com