July 29, 2020
Photography Myths Busted (Part 1)
There are some myths that even camera manufacturers tell about photography. Over the next few weeks, we’ll bust some of the biggest myths
There are some long-held beliefs in photography that are held as accurate. Most camera manufacturers are guilty of over-simplifying topics in their manuals. I’m sorry to say that some of them propagate myths that have been long-held in photography. Over the next few weeks, I’m going to bust some of these lacking tales of photography technique.
Depth of field is all about aperture
We’re going to start this series with one of the biggest myths claimed by all the camera manufacturers. In fairness to some of them, they do go on to correct the myth. Often, in a smaller font and hidden at the bottom of the section. To prove this, I’m going to quote from a selection of camera manuals. I’ll start with the Canon 600D.
“To blur the background or to make everything near and far look sharp, set the Mode Dial to
They then show two pictures, a card with a blurred background which shows an aperture value of f/5.6 and the same shot with a sharp foreground and background with an aperture value of f/32.
It’s not just Canon, here’s the quote from Nikon. I’ve chosen the D3400 manual in the section on Aperture-Priority mode.
“In this mode, you can adjust aperture to control depth of field (the distance in front of and behind the main subject that appears to be in focus).”
Again, there are two photographs, this time flowers with the blurred image showing an aperture of f/5.6 and the sharp image at f/22.
Sony and Fuji manuals don’t try to explain what changing the aperture does to the photograph. They just tell you that a button exists to switch to aperture priority mode. They make some vague comments about pressing a depth of field preview button to see the effect.
So, if you are a new photographer and doing the right thing of reading the manual to learn how to use your camera, your belief is now that the depth of field is all about aperture. The reality is that size of the hole in a lens plays a small part in the depth of field captured in a photograph.
I can demonstrate this with a photograph taken with an aperture of f/2.8. Everything you’ll have read so far suggests that the picture will have some kind of blurriness in front and behind the focus point. The problem is that the shot is perfectly sharp from front to back – how can this be when the manuals clearly say a wide aperture means a shallow depth of field? It’s because this is the first great myth of photography, and there are three other influences on the depth of field that can have a far more significant impact than aperture. To prove the point, I am going to use one of my favourite photography apps, Photopills.

The app has a great tool called Classic DoF. It allows you to calculate the depth of field by dialling in different settings. Let’s start with the calculation for a shot taken on my Canon EOS R at a zoom of 24mm with an aperture of f/3.5 stood 50 centimetres from the subject. The calculator shows us that the DOF is 9cm.

I’ll let the camera manufacturers have their time in the sun. They don’t lie to you; changing the aperture will transform the sharp area. An aperture of f/14 takes us to a depth of field of 40cm. That’s a change of four stops of light. Well done Canon and Nikon for (kind of) giving some accurate advice to your customers.

I’m going to take the aperture back to the original setting. This time, I am going to change the zoom to the other end of my lens at 70mm. The DOF reduces from 9 centimetres to just 1 centimetre! The focal length has a significantly higher effect on DOF than aperture. The longer the focal distance, the shallower the depth of field. Conversely, a wide-angle zoom will increase the depth of field.

This time, we are going to change the distance we are standing from the subject. We are going to take two steps backwards so that we are standing 1.5 metres away. The DOF increases from 9 centimetres to 89 centimetres! Again, there is a massive impact on DOF, much more significant than merely changing the hole in the lens. The closer you are to the subject, the narrower the depth of field will be. Similarly, the further you are from the subject, the greater the depth of field.

There’s one more influence on the depth of field, but this one is much less likely to change when shooting and its impact is relatively small anyway. The EOS R is a full-frame camera which has a large sensor. My very first DSLR was the Canon 350D which has a cropped sensor. If I use the original settings on the 350D, the depth of field reduces to 5 centimetres from the original 9 centimetres.

The next time you are told the depth of field is all about aperture, feel free to correct the person telling you one of the biggest myths in photography. Now let’s look at another one.
The Light Meter tells you the correct amount of light
The jump to taking photos in the Manual setting is a big one. It’s not that hard to learn, my Switch to Manual Workshop gives you everything you need to know in four hours. One of the things that you’ll need to get to grips with is the use of the light meter built into your DSLR.
Every camera manufacturer has made the ‘correct’ setting the number zero. They’ll tell you that a negative number means there’s not enough light hitting the sensor. A positive number means there’s too much light. Once again, the manuals have over-simplified the truth.
Let’s talk about the occasions when the light meter gets it wrong. Last week, when I was talking about creating a personal style, I mentioned that I like my photos to be a wee bit minimalist. Imagine, if I were taking a picture of a single tree on a snow-covered hill with a white sky behind it. It makes a great composition, so all I need to do is get the exposure right. The light-meter is going to get it wrong because of the way it works.
Auto exposure systems look across the scene for a neutral grey colour and the bases the exposure on that natural grey. It all works fine until there’s no grey in the scene like the one we are about to shoot. Instead, the camera decides that it will call the closest thing to grey in the scene, grey. In this case, white is the closest thing to grey which means that your beautiful white snow is now ugly and dull grey snow.
The same thing happens when you’re shooting something that is mainly black. The camera can’t see grey, so black is now the closest thing to the neutral tone, and your deep black photo becomes a boring grey shot. There’s a way to fix this when taking the shot. Simply over-expose by one stop of light when shooting something white. Alternatively, under-expose by one-stop when shooting black.
Wide-angle lenses for landscapes
This is a short one, but it’s an often quoted myth of photography. I’m frequently asked what ‘landscape lens’ someone should buy. When pressed a little more, what they actually want to know is what the best wide-angle lens is?
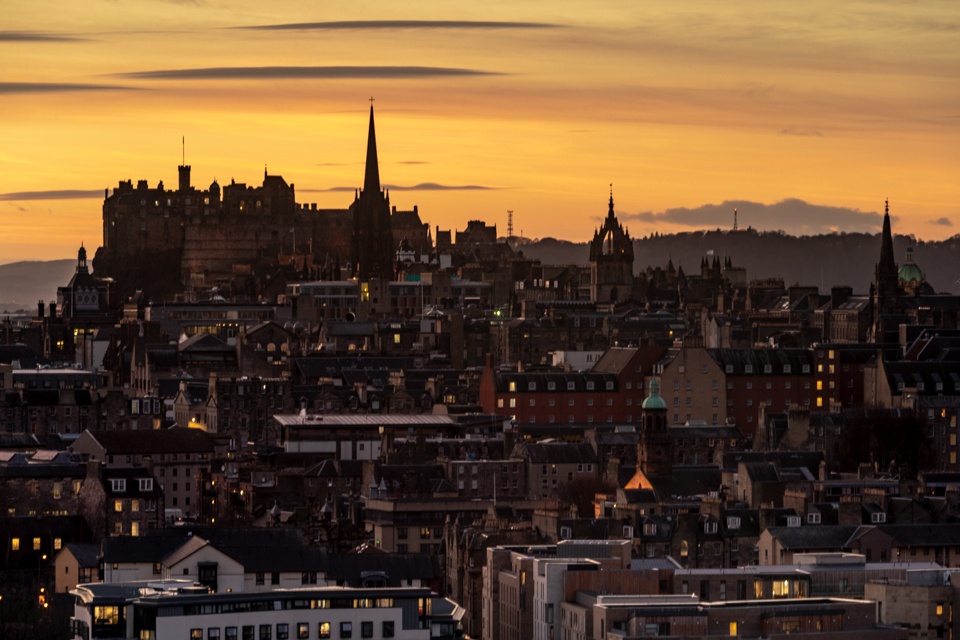
Restricting yourself to shooting all landscapes with a wide-angle lens means that you are going to lose a whole range of creativity. The landscape photography calendar I produced for 2020 has two of the pictures shot on a 70-200mm lens. There was a similar number in the 2019 calendar. Longer lenses can make objects appear that they are closer together. This shot looking across Edinburgh from the Salisbury Crags gives the impression that the buildings are crunched on top of each other.
There is no such thing as landscape lens (or for that matter portrait lenses). You shoot with the lens that provides the shot that you want.
Next week, we’ll look at some more of the perceptions that are regarded as fact. If you’ve got any bugbears about photography, add them to the comments below and we can all make our photography better.
Listen along
If you don’t feel like spending time reading these blogs, you can now listen to them instead. Head to your usual podcast providers such as iTunes or Google podcasts and search for The Edinburgh Photography Workshop Podcast. If you do like listening, please subscribe to hear it every week and leave a review. That helps others to find the podcast as well.
Give us your feedback
If you’ve got any questions or comments, leave them below. You can sign up for the Edinburgh Photography Workshop monthly newsletter where you’ll get regular updates on exciting things happening in photography and some great tips. Sign up by clicking here.![]()