December 16, 2020
Library Module in Adobe Lightroom
Harness the power of metadata in your photos and let the Library module work for you

In last week’s blog, I looked at the process to bring photos into Adobe Lightroom. This week we are going to take a deeper dive into the Library module. The Library section is probably the bit that most people spend hardly any time. However, getting to know the available features can help you to find pictures a lot faster. Let’s have a quick tour around the Library module.

Navigator
Like last week, we will work from the left panel over to the right. The first block we have is the Navigator window. The navigator is a great way to zoom into your photos to check them over before you start editing. There are three tools we can use; the first is a drop-down box to either fit the image to the main window. It will ensure that the entire image is visible. Alternatively, you can fill the window – when using this method, you may not be able to see parts of the photograph if the aspect ratio of the picture isn’t the same as the window.
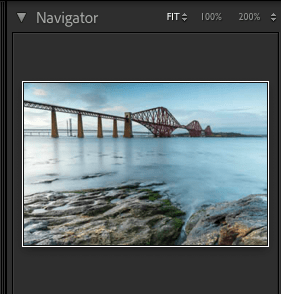
Next is 100%, which means that you can zoom in to the photograph on a pixel for pixel basis. What you see on the screen is the actual size of the image. Finally, there is another drop-down that allows you to specify the percentage of the image that you’ll see. Anything below 100% will give a wider view than actual pixels and anything above 100% an even-more zoomed view. With both of these options, a rectangle will appear in the Navigator window. It represents the area of the photograph that you can see in the main window. You can easily view different parts of the main window by clicking and dragging the square in the navigator.
Catalog
The next section summarises the photographs that are in the Lightroom catalog in a few different ways. It can also tell you if there are any issues with your catalog. The first line is a simple count of all the photographs you have.
The line All Synced Photographs, is a count of all the pictures that are being synchronised to an Adobe cloud-based service. If you aren’t using a cloud service, then this line may not appear. The next line really shouldn’t be there if you are keeping on top of your pictures, but I have made it happen by disconnecting an external hard-drive to force the error. If synched photographs have been moved from their original location, outside of Lightroom, then they will show up as a sync error. To correct this, I would need to repoint the original photograph to the new location so the sync can take place or in my case I can simply plug in the external drive.
Next, we have a quick collection. A quick collection is a handy way to quickly identify a group of photographs that you may want to do something with later on. For example, if you have been shooting and want to send a subset of the pictures, then you can mark images to add to the Quick Collection. To do this, mark the Quick Collection as the Target Collection by right-clicking on the line and take the option Set as Target Collection. Now, pressing the later B when a photograph is available will add the picture to the Quick Collection.
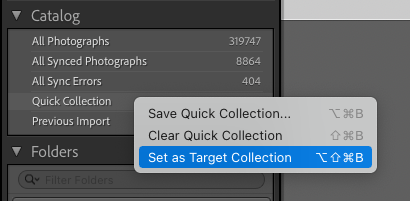
We covered Collections back in February 2019, so the obvious question is, why is a Quick Collection different to a normal one? Good question and not an easy one to answer. Adobe tells us that a quick collection is a temporary method of grouping photos, whereas normal collections are permanent. That would be a good description if the quick collection were deleted each time we close down Lightroom – it doesn’t. It will always be there until you delete the Quick Collection. The only real difference seems to be that you aren’t able to sync a quick collection but can do with normal collections.
The last line in the Catalog window is the Previous Import. It’s a handy way of getting to the previous set of photographs that have been imported into Lightroom.
Folders
The folders section allows you to navigate to a photograph or a set of photos if you know the date that a picture was taken. Like last week, if there is an arrow pointing to the right by a folder, it is an indication that there are other folders below which you can expand by clicking on the indicator. You can also shrink the folders by clicking on a downward-facing arrow.
If you have added multiple locations, such as external hard drives, then these are also visible in the folders section. A drive that is currently attached to your computer will have a little green light next to the name. One that isn’t attached won’t be illuminated.
Collections and Publish Services
The next two sections have been covered in some depth in the past. Instead, I’ll just summarise what they are for and link to past blogs. Collections are a way to group a set of photographs to make it easy for you to find in the future. You can also synchronise them to Adobe’s cloud service so that you can share them with friends or clients.
Publish Services are a sadly neglected method of sending photographs. The example I always like to use is Flickr. Typically, to send a photo to Flickr, we’d need to write a JPEG image to the hard-drive (because you are shooting RAW aren’t you?). We would then need to send that JPEG to Flickr using their upload process. A Publish Service will instead send a JPEG file to Flickr once your account is connected without the need to write it onto your hard-drive.
Main Library Window
The central area of the Library module allows you to see either a full image or a grid of images. To view an entire image, double-click on the individual file. To return to the grid view press the G key and all of the photographs in the folder or Collection you are viewing will be visible.
There is a very powerful section in the central part of the Library module that is often hidden, the Library Filter. If it isn’t visible, then click on the ‘\’ key. You can also hide it again by clicking the same key again.

This bar gives you three different ways to search for photographs meeting certain conditions contained in the metadata. They are Text, Attribute, Metadata. Let’s look at each one of them in a little more detail.
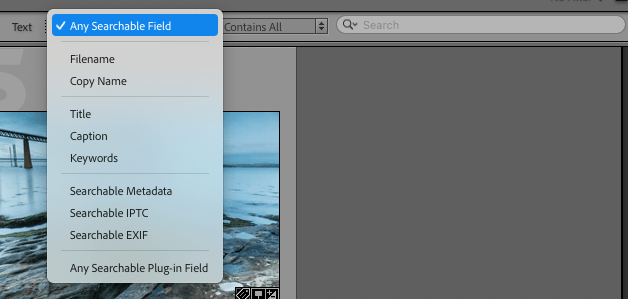
Text
Click on the word Text at the top of the Filter Bar, and it opens up three boxes. The first allows you to decide what kind of text filed you want to search in. I tend to leave the value set to Any Searchable Field, but you could, for example, set it to Keywords only, which will only search in that particular type of field.
Attributes
This section allows filters to be applied based on a flag, rating or colour label that has been used, whether or not a photo has been edited, and the kind of file.

Flags, ratings and colours are a great way of marking photos so you can use them in Smart Collections. For example, every year, I produce a calendar. Rather than waiting until the end of the year to choose the images that I use, I will add a Green color label to a photo that I think is a candidate for that year’s calendar.
The Kind of file refers to whether the photograph is an actual image, a virtual copy or a video. I like to use Virtual copies if, for example, I am providing photos to a client and they want to see different options in edits, so it is handy to be able to only see the virtual copies by clicking on the middle Kind in this window.
Metadata
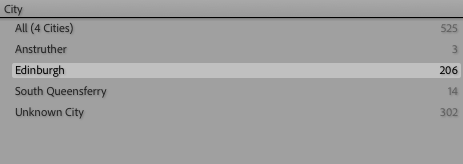
The final section allows us to filter photographs in all manner of fields that are held behind an image. Four combinations can be filtered, and you can decide by clicking on the drop-down boxes on the top section. In the screenshot below you can see the array of options that you can use.

For example, if I wanted to find photographs take in Edinburg,h then I could choose the City tab and then click on the pictures that have been labelled in the City field of the metadata. In theory, I could then apply a filter for the Color Label to be green and hey presto I could produce a calendar of Edinburgh pictures.
The one thing to be aware of with all the filters is that they only apply to the folders including and below the one currently selected. So if you wanted to search over the entire Lightroom Catalog, then you would be able to select All Photographs in the Catalog section and then apply the filters. Always remember that once you have finished using the filters to remove them. Otherwise, you may be restricted from seeing photos that don’t meet the filter criteria.
Histogram
We are now onto the right-hand panel. The histogram is another section that has been covered in previous blogs so I won’t go into a massive amount of detail. The histogram shows how light is being distributed across the image that is currently selected. The left-hand side of the histogram is pure black, and the right-hand is pure white. The bits in between are different shades of grey or the colour spectrum as they go from dark to light.
Quick Develop
I have to say that I have never used this next section. Adobe has given a few basic editing tools that can be used to enhance a photograph without having to go into the Develop module. The first line allows any presets that have been created to be applied. The second line means that you can use different White Balance presets and make changes to the temperature and tint. The final line allows adjustments to a limited set of the Tone Control tools, exposure, clarity and vibrance as well as applying the Auto edit to a photograph.
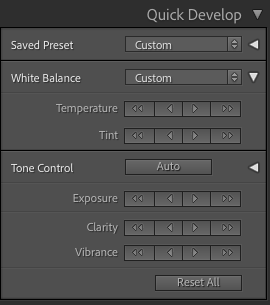
None of the tools in this section allow a fine edit to the values. Hence, they are only handy if for example, you’d carried out a shoot using the wrong White Balance setting and you wanted to apply a bulk update to all the photographs before starting to edit in the Develop module.
Keywording
Last week’s blog allowed us to add Keywords to a photo as they were imported into the Lightroom library. The first box in the section will enable us to type in any additional keywords particular to the image or images selected.
In the next area, Adobe suggests some Keywords that it thinks may be relevant for you to apply to the selected photographs. I have to be honest that this doesn’t tend to be incredibly dynamic and doesn’t add much value.
Keyword Sets can be quite useful and allow nine keywords to be defined that you may use for a particular type of shoot. For example, instead of typing the words out, a Wedding Photographer could select all of the photographs, including the bride and click on the word in the keyword set. It would then be applied to all the selected photographs

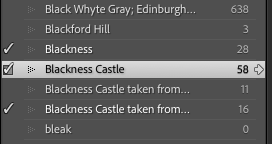
Keyword List
The Keyword List section is a way to look at all the photographs that have a keyword applied to it. To view the pictures with a particular keyword, hover over the word, and a white arrow appears. Click on the arrow and all the photographs then appear in the main window.
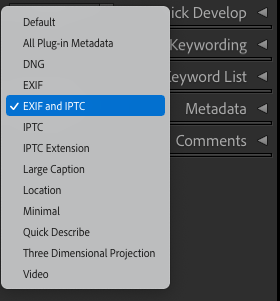
Metadata
The final section allows you to view and edit the metadata attached to a photograph. There are different views available in the section which are accessed by hitting the drop-down box at the top of the section. I prefer to use the option EXIF and IPTC, which gives the most comprehensive view of the data. EXIF data is captured on the camera such as the ISO, Focal Length etc. IPTC data is often used by photographers who send photographs for publication and includes additional information such as a caption, copyright statements and contact information.
Any box that has an indented section can be edited by typing into the box. If an option has a white arrow by the side of it, then Lightroom can find all images in the library that have used the same value.
Give us your feedback
Hopefully, this has given a deeper dive into the Library module of Lightroom. It’s a great way to make your photos more organised and easier to find in the future.
If you’ve got any questions or comments, leave them below. You can sign up for the Edinburgh Photography Workshop monthly newsletter where you’ll get regular updates on exciting things happening in photography and some great tips. Sign up by clicking here.
About the author
As well as running Edinburgh Photography Workshop, Rich Dyson is a professional photographer. His photographs feature in newspapers such as The Times, Guardian and Daily Telegraph. He also had two solo exhibitions as well as being featured in a Members-sponsored Exhibition in the Scottish Parliament. You can see and buy his photography at richdysonphotography.com
![]()