May 3, 2023
Hyperfocal Distance made easy
Understanding the hyperfocal distance can make your landscape photographs sharper from front to back. What is it?
When asked about Hyperfocal distances, landscape photographers usually respond in one of three ways. The first will be that they have no idea. Secondly, they might say they’ve heard of it, but it’s too complicated. The last group will nod wisely and understand how easy it is to use. In this week’s blog, I’d like to take you out of the first two groups and into the final one. This isn’t going to be a long post. Honestly, it is straightforward and will improve your landscape photography, particularly if you use foreground interest as a compositional tool.
What is the hyperfocal distance?
There is a straightforward definition for hyperfocal distance, which is;
“the point where you focus, so that everything from half the distance in front of the focus point all the way to infinity will be acceptably sharp.”
In practice, if you focus two meters in front of the camera, everything from one meter to infinity will be acceptably sharp. Well, that is half the practice. The other half is that the aperture and focal length influences the hyperfocal distance you are using, as well as something called the circle of confusion.
If I wanted to make this subject really confusing, I would let you try and calculate the hyperfocal distance by using this simple formula.
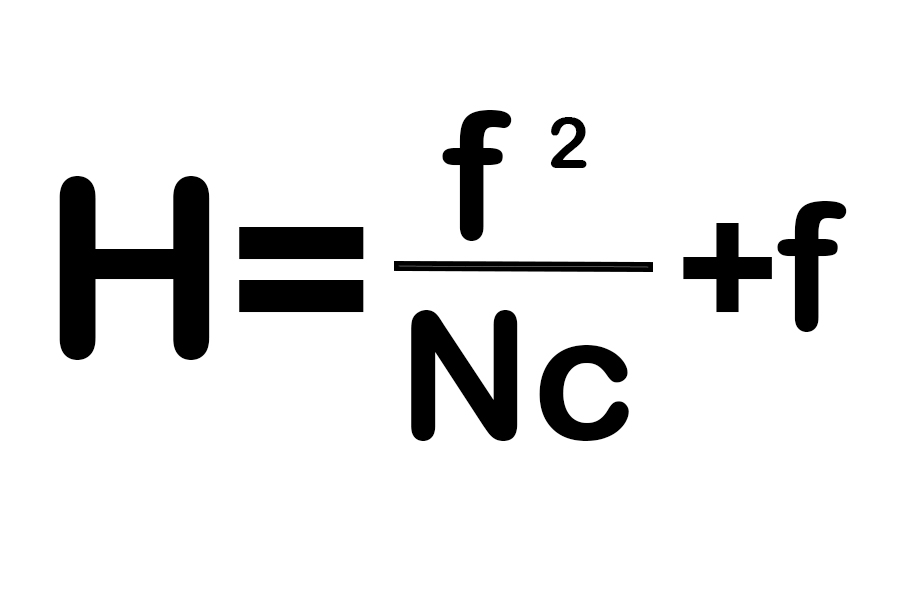
In this equation, H = the hyperfocal distance, f = the focal length, N = the aperture and C = the circle of confusion. Don’t worry; I won’t leave it there and let you do the maths. I’ll make this easier later, but first, I’ll explain the confusion circle.
The circle of confusion
You will probably think that something as weirdly named as the Circle of Confusion will be highly complicated. The explanation is easy, but calculating it is more complex.
You probably recognise the diagram below from your first-year science lessons. Let’s imagine that we have the perfect lens. All the points that light hits the lens will pass through a single focus point.
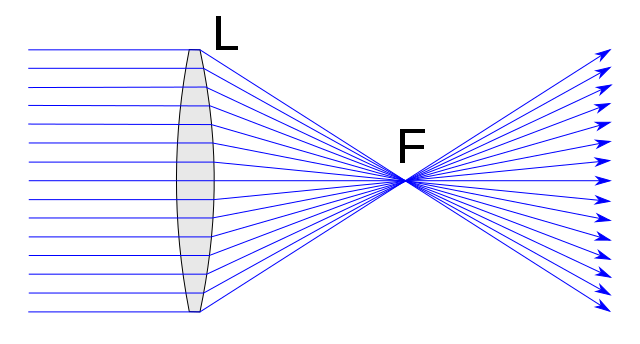
We know we don’t live in a perfect world, and I hate to tell you this, but the perfect lens doesn’t exist, either. In reality, light doesn’t get focused on a single point. The Circle of Confusion is the smallest circle through which the light rays pass.

According to Wikipedia, the standard way to calculate the Circle of Confusion is the largest blur spot that the human eye will still perceive as a point when viewed on a final image from a standard viewing distance.
There are a few problems with this when taking pictures. First of all, we don’t know how big a photograph is going to be viewed at the time we take the photo. Secondly, we can’t guarantee that the viewer will stand at the ‘standard viewing distance’. As a result, it has become practice to use a standard Circle of Confusion value based on the type of sensor or film size. For example, a full-frame camera has a value of 0.029mm, whereas a Four-Thirds system uses a value of 0.015mm.
There you go. If you know the Circle of Confusion value, you can get a pencil and paper out before taking a photo, and you’ll know where to focus. Actually, don’t bother; there’s an easier way to know where to focus to get maximum sharpness.
Using PhotoPills to calculate the Hyperfocal Distance
One of my favourite photography apps is Photopills. Currently, it costs £9.49, and then updates are free of charge. For me, it’s an incredible bargain, and the guys that produce the app could easily justify a subscription deal.
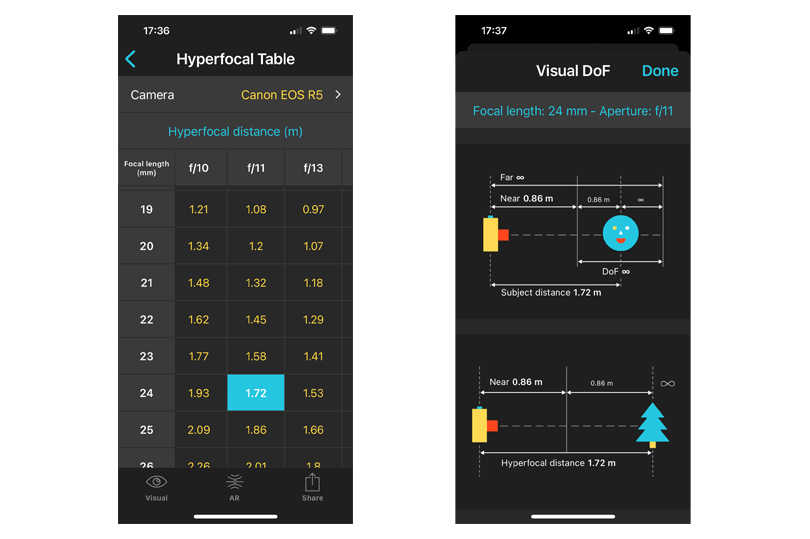
They have created an easy way to calculate the hyperfocal distance in the app. From the Pills screen, click on the Hyperfocal Table icon. Select the camera model being used at the top of the screen. You can then drag the aperture value left or right to have the f/stop being used visible. You can then drag the focal length up or down to show the zoom you are using. Where the two values intersect, you are shown the hyperfocal distance. In the example below, when shooting on a Canon EOS R5 at f/11 with a focal distance of 24mm, the hyperfocal distance is 1.72m. That means everything from 86cm in front of the camera to infinity will be acceptably sharp.
Why does it matter?
The common wisdom in landscape photography is that you should focus around a third of the distance into the scene. Quite often, this rule of thumb will work well. However, it fails when we have something close to the camera and features in the distance that we would also want to be sharp.
You can see the issue that we have in the image below. The focus point is shown at approximately a third into the scene. The result in the picture below the main image is that the rocks close to the front of the scene are a little soft and blurry.


For our second shot, I kept the camera in the same position, but this time, I used Photopills to calculate the hyperfocal distance. We can now see sharpness at the front of the picture and all the way to the back. If you are serious about getting sharp images, a couple of seconds needed to open the app and dial in two values is definitely worth the effort.


With the Photopills app, you can join that group of people who will nod sagely and say the hyperfocal distance is easy!
Please give us your feedback.
If you’ve got any questions or comments, leave them below. You can sign up for the Edinburgh Photography Workshop monthly newsletter, where you’ll get regular updates on exciting things happening in photography and some great tips. Sign up by clicking here.
About the author
As well as running Edinburgh Photography Workshop, Rich Dyson is a professional photographer. His photographs are regularly used in newspapers such as The Times, Guardian and Daily Telegraph. He also had two solo exhibitions and was featured in a members-sponsored exhibition in the Scottish Parliament. You can see and buy his photography at richdysonphotography.com.