December 22, 2021
Focus bracketing and stacking
For front-to-back sharpness in your photos, Focus bracketing or stacking is a great way to get superb results
Last week, a local artist contacted me to help them photograph their jewellery. They mainly produce necklaces made from colourful beads and jewels and sell them through Etsy. An online store needs excellent quality images to put one seller above another. The artist struggled to take the shots in a home studio setting and achieve nice sharp photos. I was able to help by using a feature built into many more recent cameras called focus stacking or focus bracketing. Some camera manufacturers offer focus bracketing, which takes photos with varying focus points, leaving the images to be processed later in an editing tool. Others have focus stacking which does the same but merges the pictures in the camera. I’ll show how to set the feature up in three of the big four manufacturers; Canon, Nikon, and Fuji. Weirdly, Sony hasn’t yet added this functionality despite it being a regular request by customers.
Canon Focus Bracketing
Focus bracketing is available in cameras such as the Canon R5, R6, and 90D. To use the feature, select Focus Bracketing from the 5th tab in the shooting menu and switch the option to Enable.
Several options can define how many images and the gap between the focus point of each shot. You will need to experiment to get the right results.
Set the number of shots that will be taken. I have found that around 50 works well for product photography. Next, set the Focus Increment. There are ten values from 1, a narrow gap between each shot and ten which is the widest. These values don’t relate to a physical distance but are adjusted automatically depending on the aperture value set at the time of shooting – start with five and adjust if you feel it’s necessary. Finally, Exposure Smoothing can suppress brightness changes during the focus bracketing process.
Fuji Focus Bracketing
Fuji has added focus bracketing to the GFX range from the 50S onwards, the XH-1, X-Pro3 and X-T2 – 4. Focus bracketing is found by navigating through the menu items; Shooting Setting > Drive Setting > Bkt Setting – scroll down and select the FOCUS BKT option. There are three options available which, like the Canon settings, are best experimenting with to get excellent results.
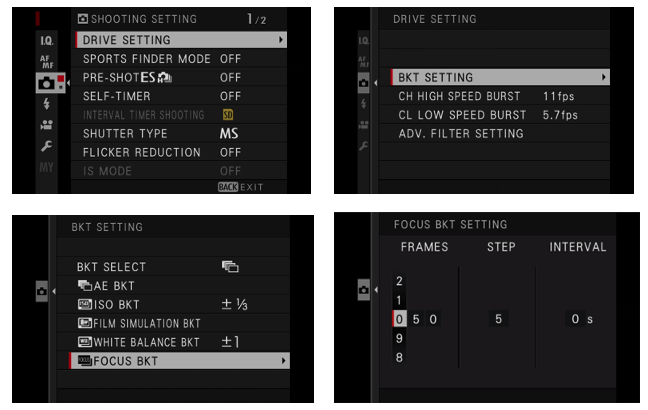
Frames determine the number of frames captured in the stack. Step is the amount of change between each photo – the bigger the number, the wider the gap. Interval allows you to set a delay between each frame if needed.
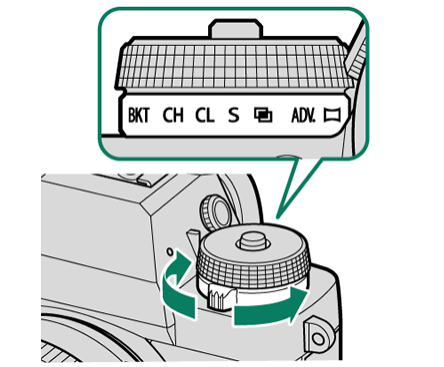
Before shooting, you’ll also need to ensure the option BKT SELECT in the BXT SETTING menu is Focus Bracketing. Check that the Drive Dial is BKT.
Nikon Focus Shift
Nikon has had an option available to focus stack in its full-frame cameras since the D850 and the Z-mirrorless range. It’s found in the Shooting Menu and tagged Focus shift shooting. Press the right arrow to display the options.
The available options will start to feel familiar to the other manufacturers;
No of shots is self-explanatory. Focus step width determines the gap between each focus point, again using a range of one (narrow) to ten (wide). Interval allows a delay between each shot, for example, if a flash is triggered and needs to recharge. First frame exposure lock will ensure the exposure is the same as the first photo, even if the lighting changes during the stack. Peaking stack image will preview the subject’s edges on the combined image. Silent photography reduces the likelihood of vibrations caused by a mechanical shutter.
Tips to shooting with focus bracketing
Now the camera is ready to go, it’s essential to take the photographs in the best way to achieve superb results. As the camera will take several shots with changing focus points, use a solid tripod. You need to reduce any chance that the camera will shake during the stack by using a shutter-release cable or setting a two-second delay after pressing the shutter button. Finally, set the initial focus point at the closest position to the camera. By the end of the stack, the camera will move the focus from the nearest position all the way to infinity.
Joining together a Focus Bracketing stack
Once the images are taken, they need to be joined together. I use Adobe Lightroom and Photoshop, but similar functionality is available in Helicon Focus, Zerene Stacker and Affinity.
In Lightroom, select all the images that form part of the stack and right-click to take the option Edit In > Open as layers in Photoshop. Alternatively, if your workflow doesn’t include Lightroom, you can open the images direct from Photoshop. Go to File > Scripts > Load files into stack to do this.
Select all the layers on the right-hand side of the screen by clicking on the top layer, holding the shift-key and then clicking on the bottom layer.

Now, go to the Edit menu, take the option Auto-Align Layers, choose option Auto in the Projection section, and press OK. It will ensure that all the various pictures line up correctly. To join them together and make the shot focused from front to back, go back to the Edit menu and, this time, take the option Auto-Blend Layers. Take the option in Blend Method to Stack Images and then press OK. I tend to leave the other two boxes checked as well.
The result is generally pretty good, but it’s worth having a close look at this point to decide if you need to use the Clone Stamp or Healing Brush to correct some minor joining errors. If the image is saved at this point, the resultant file will be huge, so to reduce it, click on Layers and take the option Flatten Image.

Give us your feedback
Focus bracketing and stacking is a great way to get front-to-back sharp images. It’s particularly useful in product and macro technology. Have a go and share your photos in the comments below.
If you’ve got any questions or comments, leave them below. You can sign up for the Edinburgh Photography Workshop monthly newsletter, where you’ll get regular updates on exciting things happening in photography and some great tips. Sign up by clicking here.
About the author
As well as running Edinburgh Photography Workshop, Rich Dyson is a professional photographer. His photographs are regularly used in newspapers such as The Times, Guardian and Daily Telegraph. He also had two solo exhibitions as well as being featured in a members sponsored exhibition in the Scottish Parliament. You can see and buy his photography at richdysonphotography.com