October 23, 2019
Create calmness with an animated GIF
A neat little Photoshop trick to give you a mindfulness image. From capture to export, how to create a calming animated GIF

I’m a lover of stills photography. Capturing a single moment in one shot gives me loads of pleasure. In this week’s post, we are going to take a series of photographs and joint them together to create an animated GIF. The end result is going to be a repeating image that shows the calming movement of water in an autumnal landscape.
Taking the shots
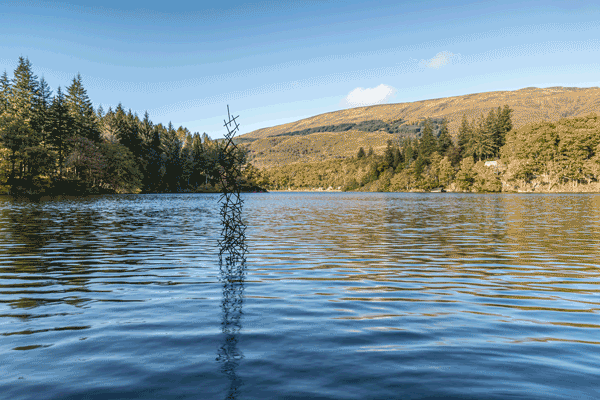
The key to creating a really good animated GIF is to get the initial images right. You’ll need to be at a location where you can see ripples moving in the water. This small loch in Stirling is perfect for this image. There’s some great light on the hills and a geometric sculpture in the water. Put the camera on a tripod to ensure that each shot will be aligned. Use a shutter release to help prevent any camera shake caused by pressing the shutter button.
You’ll need to take around 20 shots of the scene to get some nice movement in the water. The easiest way to do this is to change your camera from a single frame drive to continuous. Check your camera manual if you don’t know how to do this. Next, you need to ensure that the camera doesn’t refocus between each shot. If you use back-button focus then each shot will be taken with the focus of the first shot. If you don’t use this, once you have focussed for the first image, you can switch your lens to manual focus. Now each image will be focussed in the same point.
Go ahead and keep the shutter pressed until you’ve taken around 20 images with a shutter speed fast enough to catch some movement in the water. The shots in the image I took have a shutter speed of 1/13th of a second.
Editing the images
Now we have taken the photographs, we need to make any edits that are necessary. The key here is to ensure that any edit we make to one image is applied to all the rest of the images in the same way. Lightroom has a handy way of doing this easily.
Firstly, make any changes to one of the images in the Develop module. Next, go to the settings menu and take the option Copy Settings. A dialog box will pop up and you’ll need to check any of the settings you have changed in this first image. The easier way is to click on the Check All button and all the settings from this photograph will be copied.

We now need to apply all these changes to the rest of the images we are going to use in the animated GIF. To do this select them all in the film strip at the bottom of the develop module screen. Click on the Settings menu again, and this time take the option Paste Settings. Any changes you made to the first image will now be automatically applied to the remaining images.
Creating the animated GIF
Finally, we come to the magic bit. Joining all the images together to make the water look like it’s rippling toward us. With all the images highlighted in the develop module right-click on one of the images and take the option Edit In and then Open as Layers in Photoshop. Depending on the speed of your computer, it will take a few seconds to open up the images in Photoshop.
You’ll see that there is just one image in Photoshop and on the right-hand side of the screen all the photographs are included in layers. You’ll only see the top image on the main screen of Photoshop though. Click on the Window menu at the top of the screen and take the option Timeline. A new panel will appear at the bottom of the screen in Photoshop. Click on the button, Create Frame Animation in this panel.

On the right-hand side of the Timeline panel you’ll see three straight lines, click on this and take the option Make Frames From Layers. All the images will now appear in the Timeline panel.
You can set the time each image will be displayed before moving to the next one by changing the delay. To do this highlight the images in the Timeline panel. Click on the down arrow which will currently have the words 0 sec. and you can choose a longer delay between each image. I have included two versions of the animated GIF below. The top one is where there is no delay and the second one has a delay of 0.2 seconds so you can see the difference even a short delay has.

Finally, at the bottom of the Timeline panel ensure that the looping option is set to Forever. This means that when you use the GIF in future it will be a continuous loop giving that relaxing vision we are looking for.
Saving the animated GIF
The final stage of this process is to save the animated GIF ready for you to use. On the File menu take the option Export and then in the next menu Save for Web (Legacy).

In the next screen, you should ensure that the Preset option is set to GIF 128 Dithered. This will give you the best quality image and will prevent any Colour Banding appearing in the image. Click on Save at the bottom of the screen. Choose the location for your animated GIF file and you’re ready to use it in your social media posts.

If you’ve got any questions or comments, leave them below. You can also sign up for the Edinburgh Photography Workshop monthly newsletter where you’ll get regular updates on interesting things happening in photography and some great tips. Sign up by clicking here.
![]()