June 17, 2018
Milky Way – Shooting and Processing
Photograph and process the milky way in Adobe Lightroom
I have just returned from the beautiful southern African country of Namibia. There are many things that are great for photographers in the country but one thing you won’t want to miss is the amazing starlit night skies. Being in the southern hemisphere the core of the milky way is visible from February to October. Add to this that the skies rarely have clouds and you can pretty much guarantee the perfect conditions to shoot the astral wonder.
If you are in the northern hemisphere then the Milky Way is only visible from around mid-April to October. You can find the best time to view it by using an app such as Photopills.
Milky Way – Camera settings
When you see the Milky Way arching across the sky it is easy to point your camera upwards to capture the millions of stars. However, a really great photograph of the Milky Way also has some foreground interest as well, that connects it to the landscape.
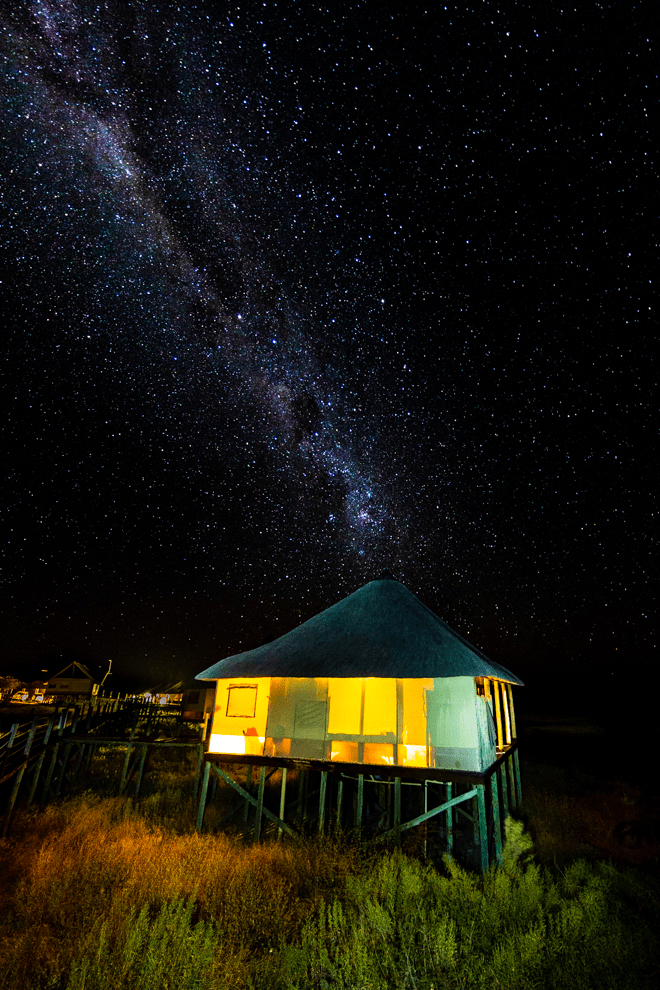
One of the last stops of the Namibia trip was in the Onkoshi Camp in the Etosha National Park. The view from my room was of the next cabin pointing towards the south so it made the perfect feature for one side of the Milky Way to explode out of.
It is possible to find out in advance where the Milky Way is going to be visible by using an app for your smartphone called Photopills. They have some great tutorials on their website to show you how to plan your shoot but in this case, the band of stars was very clearly visible so there was no need to use the app.
The most important equipment you need to shoot the Milky Way is a good solid tripod and a wide-angle lens. It helps if you are using a full-frame camera as the field of vision will be much greater but even with a cropped sensor, you can get great results.
Freezing the stars in the Milky Way
The next key step is to understand the shutter speed that is required to ensure that the movement of the earth spinning doesn’t give the impression that the stars have light trails.
Photopills has a nice feature called Spot Stars which allows you to type in the aperture, the focal distance and the minimum declination of the stars. The minimum declination is the lowest angle of the stars you are shooting, however, if you are in doubt then you can leave it set to the default of zero.
There are two accuracy settings that you can choose from in the app. Accurate, which will properly freeze the stars movement and Default which gives a barely noticeable movement. You will need to decide if you will compromise a longer shutter speed to allow a lower ISO. The decision is best made by how you will use the photograph in the future. If you are going to be printing on a large scale, then you are best to use the accurate method whereas social media use would be fine to use Default.
You will see that there are two different shutter speeds being presented. The first is an older rule of thumb called the 500 Rule. This is calculated by dividing 500 by the focal length and was a good way to ensure that film captured the stars. Digital photography technology has improved the sensors’ ability to capture the stars with a faster shutter speed so now it is more appropriate to use the NPF rule which also uses the number of megapixels in your camera.
Milky Way shoot settings
Based on the two accuracy settings I could either shoot at the widest angle on the Canon 11-24mm lens with an aperture of f4.0 for 14.42 seconds using the accuracy method or 28.84 seconds using the default method. As I’m not sure if the image will be printed large or not, I decided to take an average of the two and shoot for 20 seconds.
I am comfortable using a wide-open aperture because I was standing around 10m from the cabin which means that the depth of field would be from 92cm in front of the camera to infinity.
Next, I need to set the ISO that is going to ensure that we don’t get any blown-out highlights in the image. We were lucky that the cabin was occupied and there were lights switched on, so we could simply use the histogram on the camera in live view to set an ISO where the right-hand edge of the graph was just touching the right-hand side of the dynamic range – this is known as exposing to the right and I’ll be doing a blog on this in more detail in a few weeks. If you don’t have a lit subject, then you could shine a torch-light toward the foreground interest and set the ISO in the same way. The ISO was calculated at 2000.
Now we need to ensure that the photograph is nice and sharp. This is where using live view will help immensely. Most cameras allow you to ‘zoom in’ to a small area of the image – note this is different to using the zoom on your lens – if you look for a magnifying glass on the back of your camera with a + sign inside it then this will allow you see more detail of the image. Find a straight line in the foreground interest and use your manual focus ring to get the straight edge nice and sharp. Again, shining a torch onto the area will help you to see the edge more clearly on the back of the camera. Remember, if you are using back button focus there is no need to switch your lens to the MF setting to manually focus. If you still have the shutter button working with the ‘half-press’ method, then you will need to stop the lens from auto-focussing.
You are now ready to shoot, either use a remote shutter release to prevent camera shake or set your shutter delay to either 2 or 10 seconds depending on the stability of your tripod to prevent any camera shake occurring when you press the shutter button.
The roof of the cabin obviously wasn’t lit by the internal lights so to try and get a nice balanced exposure I used a torch for just one or two seconds during the exposure to ‘paint’ light onto the roof.
Check the resultant image to ensure that there haven’t been any blown-out highlights created either by the light painting or the ISO being too high. If there are then you can either reduce the ISO slightly or spend less time light-painting. With a bit of practice, you’ll know how to get a well-balanced exposure with just one or two attempts.
Don’t be tricked into thinking the image on the back of the camera is too dark (or even too light). The rear screen hasn’t been calibrated in the same way a large screen monitor is, so rely on the histogram to let you know if the image is over-exposed or not.
Processing the Milky Way
I’m sure there are as many ways to process a Milky Way photograph as there are Milky Way photographers so this is my method using Lightroom which you can use as a starting point and then tailor to your own preferences. All these changes are made in the Develop module.
White Balance Adjustment
The white balance is the colour temperature of light and is expressed in a Kelvin value. Daylight is usually around 5500k. Colder temperatures are expressed using a lower value and warmer temperatures a higher one. I have found that a value around 4000k works best for Milky Way images.
Exposure adjustments
If you have shot the photograph as a raw file, then your camera has recorded a lot of detail that you can’t ‘see’ when it is imported into Lightroom. The most important data that is recorded is approximately 2 stops of light at either end of highlights and shadows. Let’s first add in 1.5 stops of exposure into the photograph – I do this in post-processing to prevent the need for even higher ISO values.
We want to darken the night sky so that the stars that form the Milky Way stand out. Reduce the Shadows slider to around -85 and the Black slider to -30. This helps give more detail to the stars and we can increase the detail yet more by moving the Clarity slider to +45 which really makes the stars stand out. The change in exposure has led to the highlights blowing out which we can pull back by reducing the White slider, move it back until the histogram is touching the right-hand side again – a value of -50 has given the right result. The Milky Way contains many different coloured stars, not just white, so we can boost this by increasing the saturation to a value of around +25.
Our final exposure adjustment to the entire image will add even more difference between the stars and the darker areas of the image. We do this by adding what is known as an ‘S curve’ in the Tone Curve section of Lightroom. The first thing we are going to do is click on the line that is going diagonally from the bottom left to the top right around at the intersection of the bottom left faint square and drag it slightly downwards. Next, drag the line in the top right-hand faint square slightly upwards so it creates a shape like a letter S. The downwards drag made the darker areas darker, and the upwards one, the lighter areas lighter.
Boosting the Milky Way
The next thing we are going to do is boost the Milky Way even more. We do this with the adjustment brush tool which is found on the right-hand side at the top of the Basic section. Click on the tool and the box below will change slightly. If you double-click on the word ‘Effect’ then all the values are reset to zero. We are going to set the Highlights to around 50, clarity to around 35, and saturation to 50. We need to tell Lightroom how big the adjustment brush should be by scrolling downwards slightly and changing the Brush size to 17.0, Feather to 95 which gives us a soft brush to paint with. Leave the other two values at 100.
Now we can paint over the line of the Milky Way in the photograph, taking care not to go over the roof of the cabin if you do then you can remove the effect by pressing alt whilst painting over the area done by mistake. Press Done when you are finished. This gives a final boost to the stars that make up the milky way.
Crop and tidy
The final stage to producing the image is to crop in the image and remove any light elements such as the buildings on the left of the image that was being lit in the resort and a few stray lights that are coming into the left of the image.
The final image gives us a beautiful view of the Milky Way with a great environmental context. I’d love to hear any comments by e-mailing me at contact@edinburghphotographyworkshop.com or you can join the mailing list by clicking here.
Shooting the night sky is really fun. Whilst we don’t have a chance to shoot the Milky Way on the Edinburgh Photography Workshop Night Photography session there are other great things you can do when the sun goes down.