March 10, 2021
Spring clean your Lightroom Catalogue
The days are getting longer, and we’ll soon be out shooting more. Now’s the ideal time to Spring-clean your Lightroom catalogue

Over the last few days, we can’t fail to have noticed there’s a change in the air. The mornings and evenings are getting lighter. The weather feels a wee bit better. Fingers crossed, we are also going to start to get out a little more shortly. We’ll soon have the ideal conditions to be out shooting more. However, before we spend all our time taking photos, the next few weeks are an excellent opportunity to do a spring-clean of our Lightroom catalogue.
Giving the catalogue a tidy will help everything to run a little bit quicker. It will also help you to be able to find photographs in the future easier. So, what are the steps that a good spring-clean will entail? Read on to find a few tips to keep our photo-library in tip-top shape.
Backup first
Before we start on the Lightroom spring-clean, it’s a good idea to take a backup of your catalogue. If you don’t schedule backups automatically (you should!), we can trigger a backup. Go to Edit > Catalog Settings (Windows) or Lightroom Classic > Catalog Settings (Mac OS), and on the General tab, change the Backup catalog drop down to “When Lightroom next exits. Now close Lightroom, and a pop-up box will appear.
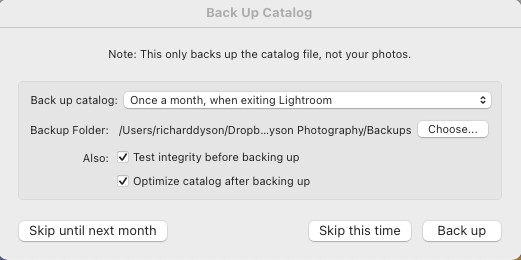
I like to take a backup every month so take the option “Once a month, when exiting Lightroom”. You can decide where you’d like the backup to be stored, and then I leave the two checkboxes for Test Integrity and Optimize catalog ticked. Take the option to Back up, and Lightroom will go to work. The backup we are taking isn’t backing up the physical photographs. The catalogue only contains the metadata that tells Lightroom what edits have been made and your photos’ location. You can read more in Blog #19
Remember that every backup essentially creates a copy of your Lightroom catalogue. I have eight years of photos within my catalogue, and the size is around 3.5GB. It would be relatively easy to fill the hard-drive with backups, so it is good practice to retain the last three generations. Once the backup has finished, we are ready to start the spring-clean.
Free up your hard-drive
As your hard-drive gets closer to being full, you’ll notice that it starts to run slower. Most people will probably do more editing of their most recent images. If that’s the case, then there’s no need to keep all of your photos on your computer’s hard-drive. The vast majority of my photos are on an external hard-drive. You can get 6TB of storage for around £100, so it is a relatively cheap way to keep your images. You shouldn’t trust a single hard-drive to keep your photographs safe, so I also have a separate backup of my pictures through an online service. You can read more about my backup strategy on Blog #54.
To move your photos off your hard-drive to an external drive, whatever you do, don’t move them through Windows Explorer or Finder on the Mac. All this will do is create an error in Lightroom. Instead, we need to move the photos from one location to another inside of Lightroom. To do this, go to the Library module. On the left-hand panel, simply drag the folders from your computer hard drive to the external drive. If the hard-drive hasn’t been used before, click on the ‘+’ sign at the Folders panel’s top.
Get rid of the photos you don’t want
As part of the import process into Lightroom, I use various flags to decide if I want to keep or get rid of pictures. I’ll add a ‘Pick’ flag to the images I definitely want to keep (you can do this by pressing the letter ‘P’ while the picture is selected. The ones I want to get rid of have a ‘Reject’ flag added (by pressing ‘X’ with the chosen photo). The shots I’m not too sure about are left unflagged.
If you haven’t already done so, you can remove the rejected photos from both the catalogue and the hard-drive. Go to the Photo menu in Lightroom and take the option ‘Delete rejected photos’. You’ll have the option to either just remove from Lightroom or delete from the hard-drive. If these are your bad photos, then take the second option.
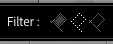
You might want to use this spring clean as an opportunity to review any photographs that you weren’t sure of keeping. Use the filter bar at the bottom of the Library module to just show unflagged photos. You can also use the Metadata filter in the Library module to do the same thing. If you can’t see the filter, click on the ‘\’ key, and it will appear at the top of the Library module.
Optimise the hard-drive
We have been doing quite a bit of moving files around inside Lightroom. To get the program running as fast as possible, it is worth running a quick process to optimise the way the catalogue is working. Go to the File menu in Lightroom and take the option ‘Optimize Catalogue’. It will take a few minutes to finish, but once it’s complete, you should have a much cleaner catalogue ready to take all those great photos you’ll be snapping in the coming months.
Give us your feedback
If you’ve got any questions or comments, leave them below. You can sign up for the Edinburgh Photography Workshop monthly newsletter, where you’ll get regular updates on exciting things happening in photography and some great tips. Sign up by clicking here.
About the author
As well as running Edinburgh Photography Workshop, Rich Dyson is a professional photographer. His photographs are regularly used in newspapers such as The Times, Guardian and Daily Telegraph. He also had two solo exhibitions as well as being featured in a members sponsored exhibition in the Scottish Parliament. You can see and buy his photography at richdysonphotography.com
![]()