April 15, 2018
Panorama photographs – Capture to print
How to take great panorama images and then get them ready to be printed
Sometimes you want to capture a scene which even the widest of wide lenses can’t take in. That’s when knowing how to make a panorama is going to really help.
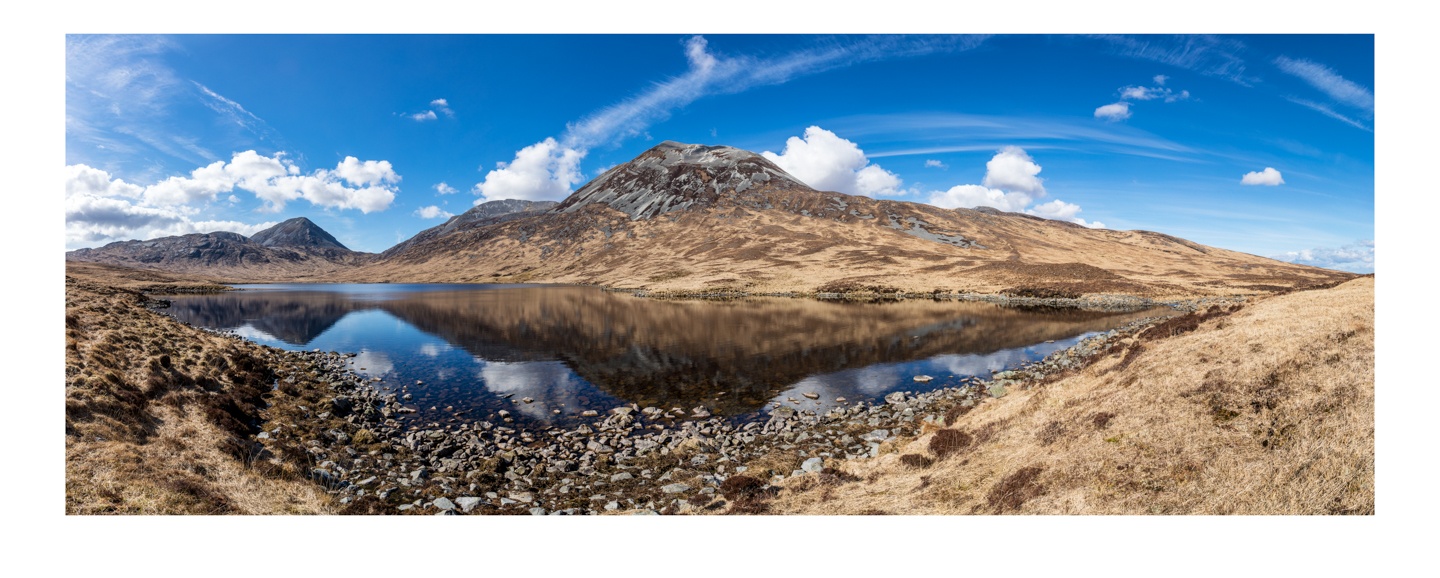
A couple of weeks ago, I was on the wonderful Scottish island of Jura. With just over 200 residents on a 142 square mile land mass, it is usually pretty isolated. However, just to get that extra solitude a two-hour walk from the single-track road to a loch with a view of the Paps of Jura gives you an extra sense of being alone.
The conditions for the shot were pretty good. The sun was shining onto the mountains from behind where I was stood. The wind was still, giving great reflections in the water. The sky was blue with puffy white clouds. The only thing we need to do now is to get the shot.
Choosing your gear
To get a good panorama image you need to have a tripod that will allow you to shoot in portrait orientation. The tripod should also be able to be rotated and ideally, it will have spirit levels built into the head. I use a Manfrotto 055 magnesium tripod with an Oben BE-117 ball head which I connect with a L-plate, so I can mount the camera in portrait orientation. The panorama effect is created by taking multiple images of a scene and using software to join them up later.
You will get much better results if you mount your camera in a portrait orientation. This is because all lenses are convex and therefore the longest edge is distorted the most. By making the longest edge the one that runs up and down instead of side to side you will get less distortion visible in your end image.
Key to getting a great panorama is making sure that every part of your tripod is level. This is so that as you rotate your camera from left to right across the scene the horizon stays straight. You can buy a levelling base head which will help to make straightening easier but I always try and save money if I can!
The L plate I use has an indicator to show where the centre position is. By lining this indicator up, you will ensure that your camera is going to rotate around a stable point. Start from your tripod legs and set them at a height so that the spirit level on your tripod is showing the bottom of the head is level. Next, set your tripod head so that the camera is also level. If your tripod head has a knob to loosen the head to allow it to move from left to right, then leave it loose. You are now set for taking the images.
Shooting the panorama scene
I always measure the light in the brightest part of the scene as you can never retrieve blown out highlights in post-processing. In this case, the sun was shining toward the right of the scene, so my light meter was set pointing that way.
It’s also worth talking about White Balance at this stage. If you leave it in the factory default setting of “Auto White Balance” then there is a good chance that it may change as you take multiple images to create the panorama. To get over this, set your camera to a static white balance such as daylight. You don’t need to be too picky as it is easy to change later in Lightroom.
One of the hardest things to do after a day of shooting is to work out where each panorama image starts. To help with this take a photograph with your hand in shot pointing toward the right so you know the next photo will be the start of the images. When you finish the sequence of images take a final photograph of your hand pointing the opposite way to signify the previous image was the last of the set. One final check is to make sure that mountains aren’t going to get chopped off the top of the frame and anything you want in the foreground is also within the sweep of the tripod head.
Now we come to actually shooting the images we are going to use later to process into our great looking panorama. The first picture on the left should start a little further to the left than you want your end result to be – this gives you some wiggle room just in case your camera isn’t perfectly level. Take a note of something on the right-hand third of the image and now twist the tripod head so that it is on the left-hand third of the image. By doing this you are giving the software enough information to be able to join each of the images together later. Carry on using the same process until you have captured the entire width of the panorama (and a little bit more at the right for that wiggle room).
We’ve got the image in the camera now and everything else can be done back in the office with a cold beer. If you’ve been at a great scene like the Paps of Jura to shoot your panorama, pack up your camera and sit and experience the scene with your own eyes. Sometimes as photographers we get too wrapped up in taking the photographs to appreciate what nature offers us.
Processing the files in Lightroom
The best tool I have found for creating a panorama is Adobe Lightroom. Adobe has made some great developments of the software since it became a subscription service. Merge to panorama was one of the first tools they introduced as it got its CC badge attached to it.
Don’t make any change to the individual shots until after you have merged them – Lightroom is going to create a .DNG file which will give you all the data and control you have in a standard raw file.
Select all of the photographs that make up your panorama and then either right-click on one of the images and hover over the Photo Merge option then click on Panorama or, even easier, simply press Shift and M.
The Panorama Merge Preview box will appear with a preview of what your image will look like. You will see that there are some areas of white around the image. This is where algorithm that joins the images together can’t find the data that matches to the previous image – the more careful you set up your tripod the less white there will be. You can remove this white really easily though by simply dragging the Boundary Warp slider to 100%. (I wish Adobe would give you the option to do this every time automatically!).
The next option we can take is the kind of projection we want to use. There are three options, although in this image only two will work.
Spherical – This projection imagines that the image had been printed inside a ball then has been stretched out and flattened. The best time to use this is when you have produced a 360-degree panorama.

Cylindrical – This time the projection is being done as if the image was printed inside a cylinder and then flattened. This is really great to use for wide panorama shots.

Perspective – The final projection mode is great for architectural panorama images as it maps the panorama as if it were mapped onto a flat surface. It looks for straight lines in the image and makes sure that the lines are kept straight. As the Paps of Jura image doesn’t have obviously straight lines, Lightroom can’t map this projection.
All that is left to do now is to press the Merge button and Lightroom will create the panorama for you. The end file is output with all the capabilities of a raw file so now you can edit to your heart’s content. In this shot, there is over 200mb of data in the end file, so you will really be able to pull out details.
Enjoy the panorama image
The end panorama image looks magnificent printed and I have released a limited-edition 48 inch wide print for sale. If you would like to buy this beautiful shot, just click here.
Panorama images are just one of the subjects I cover in the full day Landscapes and Seascapes workshop. This runs monthly between September and March and is a sunrise to sunset tour along the banks of the River Forth.