July 10, 2019
Kase Filter Trial
A comparison of the Kase Wolverine Filter System and Lee Filters
As a landscape photographer, my images improved the day I started to use filters. Not too long ago, it was an easy choice of buying into the Cokin’s budget system or Lee’s high-end and high-priced version. The phrase, you get what you pay for, was definitely true for filters. Any photographer wanting to be serious bought into the Lee system and for years it remained relatively unchallenged. I have been a Lee user for over 10 years. However, in the last few years, there have been several newcomers to the market, all promising better quality than Lee. Whilst I was at The Photography Show in Birmingham in March, I had a chat with the guys from Kase filters, one of Lee’s competitors, and I was really impressed with their product. They have sent over the Wolverine Entry Level Kit for me to try out for a couple of weeks.
Look and Feel
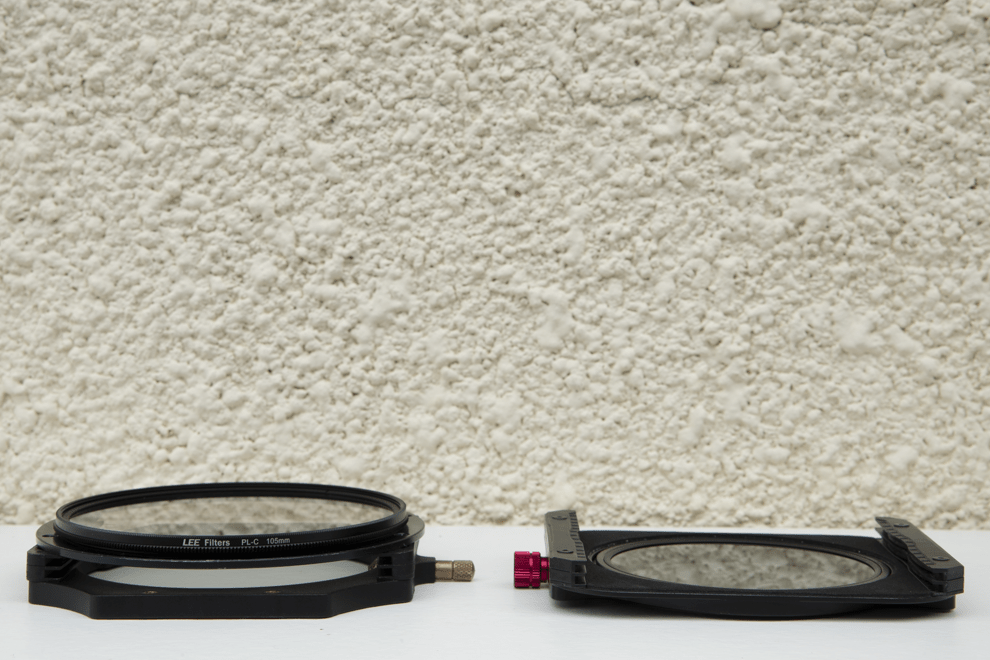
There are two things that are noticeable when comparing the Kase and Lee systems. Firstly, is the placement of the Circular Polarising filter. On the Lee system, the polariser is an optional extra and screws onto the front of the system. This can be beneficial as it means that you can have filter rings on different lenses and unclipping the system from one lens and attaching to the other will also take over the polariser. However, I often found that in cold weather, it was difficult to unscrew the polariser from the holder when packing away.
The Kase filter system kits come with a polariser. The polariser is magnetically attached to the filter ring which means it is easier to attach than the screw system. The downside to this arrangement is that most of my lenses have a 77mm diameter and one is 82mm. This means I need to also push out the polariser from one ring and attach to the other when switching between the two diameter sizes. Whilst we are discussing lens diameters, it’s great that the Kase systems come with filter rings to fit 67mm, 72mm, 77mm and 82mm lenses – Lee still requires you to buy the filter rings separately.
The second difference is the noticeable depth between the two systems. In the picture below, the Lee system on the left is noticeably thicker than the Kase on the right. This is primarily caused by the polariser placement on the Lee system, but the filter slots on the Kase system are also much tighter. They can do this as the system also incorporates a gasket to prevent light leakage, whereas the Lee system needs to allow space for the longer exposure NDs to have a gasket fitted to the filter.
Kase Filter Drop Test
One of the reasons I was attracted to the Kase stand in Birmingham was that I had been told the filters could be dropped without cracking or scratching. I recently had a rather expensive accident on a workshop resulting in three filters being broken, so this is even more appealing. As I was using a loan set from Kase, I didn’t want to try the claim for this review but I was demonstrated it at Birmingham. In the video below, you can see how the Wolverine glass in the Kase filter system can cope with drops and still be as good as new! Just for clarity, there is a disclaimer on the Kase website:
“Kase Wolverine Filters are tough, but not indestructible. We do not guarantee they will not break, but they will normally do better than standard glass filters.”
I have used my Lee filters extensively over the years, but both the glass and resin filters are both showing signs of wear from a few near misses. Buying into the Kase filter system could easily save money over the long-term with fewer replacements needed.
Kase Filters in the field
Whilst the look and feel are important and the near indestructibility of the filters is great, the most important thing is how they perform. I have only compared the like-for-like filters in this review. The entry-level kit contains the 86mm circular polariser, a 3 Stop Soft Graduated filter and a 6 Stop ND filter.
The first location I used to test the two systems was Cobbold’s Point in Felixstowe. The light on the day of shooting was fairly flat which meant I didn’t need to use a graduated filter for the shot. The left image is the Kase filter system and the Lees system is on the right. Both images have been imported into Lightroom without any changes applied, except for Lens Corrections and Chromatic aberration.
Both images were shot with the same exposure values. The White Balance was set to daylight to ensure that the camera wouldn’t adjust the output. There is a clear difference in the two images with the Lee system appearing bluer. Whilst I think this is a more pleasing output, the reality of the scene was much closer to the Kase colours.
I also noticed that the histogram on the Kase system had slightly more data toward the highlights. At the time I thought this could have been due to the changing light, albeit the light at the scene appeared the same. I’ve shown the two histograms below to evidence how much of a difference there is between shots taken just a few minutes apart.
There isn’t a massive problem with filters appearing brighter or darker. However, if this is consistent across all filters produced by the manufacturers, it could affect you when using the Expose to the Right technique. I found that to ensure there were no over-blown highlights I need to shoot 1/3rd of a stop faster on the Kase filter than the Lee one. This could mean the difference between a 25-second exposure with Kase versus a 30-second exposure on Lee. We’ll explore this in more detail later in the review.
Graduated Filters in the field
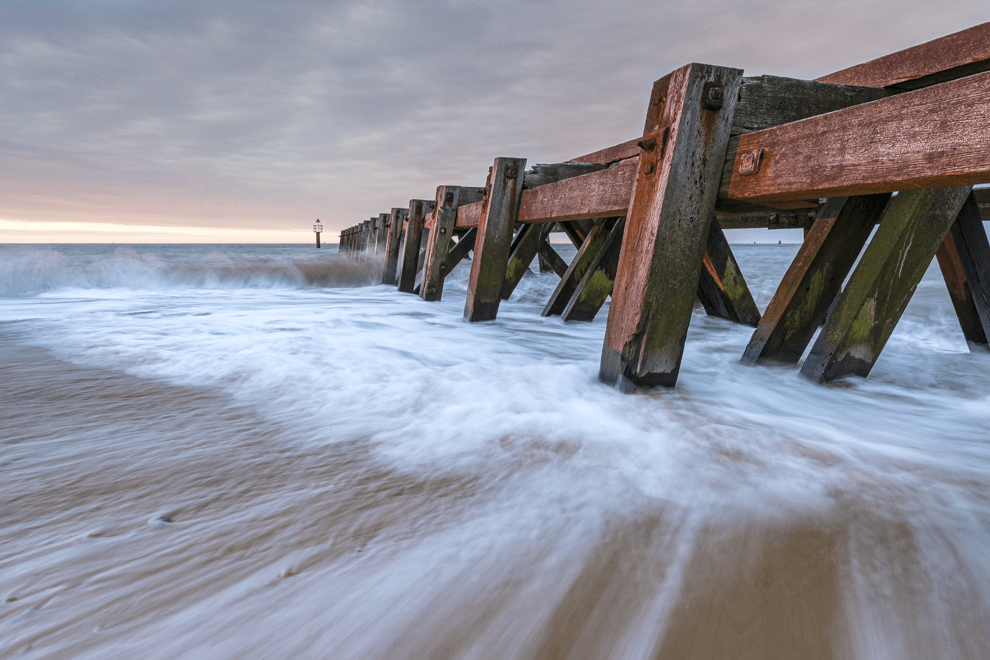
The second location I used was Landguard Point, also in Felixstowe. This is a less scientific test, as the shots were taken during sunrise so the light was changing quite quickly. I wanted to retain detail in the waves, keeping the exposure at 1 second. However as the right-hand side of the scenes had the wooden pier in the frame, I angled the 3 stop graduated filters to cover the sky. Both the graduated filters coped well with the scene with detail being retained in the sky. Again, the Kase image is on the left and Lee on the right.
Colour Test
The final test I wanted to do had to be in a more controlled lighting situation. I had noticed two differences between the 6 stop filters in the field. The Kase filter resulted in a lighter image. The Lee filter in a more blue image. I wanted to check if these differences were a reality in flat lighting, where the ambient light was going to be the same.
The test took one shot without any filters in front of the lens. I then added the 6 stop Kase filter and adjusted the shutter speed by 6 stops to compare the output. The final shot is then taken with the Lee filter using the same settings. By comparing these three shots we should be able to see if there is any change in brightness and if any colour casts were resulting in adding the filters.
The most obvious difference between the three images is that the Lee system clearly adds a blue cast to the images whereas the Kase system adds a little warmth. The Kase filter system more accurately reflects the colours you would see if the filter hadn’t been added. Whilst some long exposure images can benefit from a blue tint, I want it to be my decision if I add this in post-processing, not the filters.
I then wanted to see if there was a brightness issue. The easiest way to do this is by comparing the histograms of the three images. Surprisingly, the Kase filter has marginally less data in the highlights than the shot taken without the filter. The Lee system has even less data in the highlights so the observation in the field has been backed up by the more controlled test. The takeaway from this is what we thought was 6 stops when using the Lee system was actually marginally less!
Kase Filter system conclusions
The first thing that needs saying is that both the Kase and Lee systems are good performers. However, I need to make an informed view if one is better than the other. For me, the Kase system out-performs Lee in a number of aspects.
In terms of pure photographic performance, the controlled tests at the end of the review show the Kase filter to more accurately capture the scene colours. It also more closely changes the exposure by the ND value being applied.
The build of the Kase holder, with the gaskets being incorporated into the holder and the polariser being inside the system instead of on the outside, will give me the capability to use three filter slots without any noticeable vignette being caused by the system. However, as I have lenses with different diameters, I am going to have the pain of switching the polariser from one ring to another. I guess the other option would be to buy a second polariser allowing me to leave each ring with a polariser attached.
This brings us to the issue of cost. The two manufacturers don’t produce like-for-like kits. In order to compare, I’ll use the starter kit supplied by Kase and make up the equivalent kit using Lee products from Wex. The Kase Wolverine Series – Entry Level Kit contains the holder, a soft filter bag holding up to 10 filters, a 6-stop ND filter, a 3-stop soft graduated filter, a circular polariser and filter rings to fit 4 sizes of lenses. The cost for this kit is £350.
The Lee Landscape Kit contains the filter holder and a 2-stop graduated filter at £168. A 6-stop ND filter is £89. The slimline landscape circular polariser is £157 and needs a polariser ring to attach it to the system which is an additional £42. The adapter rings for the Lee system cost £36.95 so I’ll work on the basis of having two of these. Finally, the Lee filter pouch which holds 10 filters is £34.99. This is a total of £564.89.
Given the cheaper cost, the performance improvement in the Kase system and the added bonus of almost indestructible filters, for me there is no doubt that I would recommend the Kase Filter system.
The Kase filters would be ideal for someone attending either the one-day Landscape and Seascape workshop or the three-day West Highland Landscapes workshop. You can also sign up for the Edinburgh Photography Workshop monthly newsletter where you’ll get regular updates on interesting things happening in photography and some great tips. Sign up by clicking here.